Quantcast
Channel: windows –易春木
Viewing all 57 articles
Browse latest View live

如何使用 Windows Event Viewer 去看系統發生什麼事 ?

$
0
0

這次遇到某個BT module在系統開完機之後, 會發生yellow band在裝置管理員裡面, 方法之一就是去看 system event log 看看發生什麼事!

微軟教學: 事件記錄檔中顯示什麼資訊? (事件檢視器)

What information appears in event logs? (Event Viewer)

您必須以系統管理員的身分登入,才能執行這些步驟。如果您並非以系統管理員的身分登入,則您只能變更套用到使用者帳戶的設定,且可能無法存取部分事件記錄檔(event logs)。

事件記錄檔(event logs)是很特殊的檔案,其中記錄電腦上的重要事件,像是使用者何時登入電腦或 程式何時發生錯誤。發生這類型的事件時,Windows 會在事件記錄檔中記錄事件,您可使用 [事件檢視器Event Viewer] 來讀取此記錄檔。進階使用者可能會發現,事件記錄檔中的詳細資料有助於 Windows 及其他程式問題的疑難排解。

[事件檢視器Event Viewer] 以幾個不同記錄檔來追蹤資訊。Windows 記錄檔包含:

  • 應用程式 (程式) 事件(Application (program) events. )。依嚴重性為標準,事件可區分為「錯誤」、「警告」或「資訊」( error, warning, or information)。錯誤指的是顯著的問題,像是資料遺失。而警告指的是本身並非十分顯著、但以後可能會發生問題的事件。資訊事件則是描述程式、驅動程式或服務的成功操作。
  • 安全性相關事件(Security-related events)。這些事件稱為「稽核audits」,可根據事件狀況而說明成功或失敗,例如使用者嘗試登入 Windows 是否成功。
  • 設定事件(Setup events)。設定為網域控制站的電腦會在此顯示額外的記錄檔。
  • 系統事件(System events)。系統事件由 Windows 與 Windows 系統服務記錄,可區分為錯誤、警告或資訊。System events are logged by Windows and Windows system services, and are classified as error, warning, or information.
  • 轉送的事件(Forwarded events)。這類事件由其他電腦轉送到此記錄檔。These events are forwarded to this log by other computers.

應用程式及服務記錄檔的內容相當多樣。包含在電腦上執行之程式的個別記錄檔,以及與特定 Windows 服務相關的詳細記錄檔。

  1. 開啟 [事件檢視器],請依序按一下 [開始] 按鈕 [開始] 按鈕的圖片、[控制台]、[系統及安全性 System and Security] 及 [系統管理工具Administrative Tools],然後按兩下 [事件檢視器Event Viewer]。‌ 需要系統管理員權限如果提示您輸入系統管理員密碼或確認,請輸入密碼或提供確認資訊。
  2. 按一下左窗格中的事件記錄檔。
  3. 連按兩下事件以檢視事件的詳細資料。

Dale Powell教學影片: How to Use the Windows Event Viewer

Just another brief How-To video about how to use the Windows Event Viewer to check for application and system warnings and errors.

1. 如何開啟
2. 通常會去看windows底下的log
3. 發現error, 可以把描述的關鍵字google一下
4. 確保下次reboot可以看見新log, 可以執行 clear log 清除


Win7- 在startup去設定HOMEDRIVE,HOMEPATH , HOME等去設定環境變數

$
0
0

引用自superuser, 一個範例去設定系統的環境變數在windows7或winXP上!

  1. If you are on Windows 7, you can skip this step. If you are on Windows XP, download and installWindows XP Service Pack 2 Support Tools which contains SETX, a utility, described on SS64and technet, that lets you set permanent system and user variables. You must have administrative rights to set global system variables. The basic usage is SETX <variable> "<value>" [-m].
  2. Add the following script to your startup folder – W7: "C:\Users\<username>\Start Menu\Programs\Startup" and XP: "C:\Documents and Settings\<username>\Start Menu\Programs\Startup".
    SETX HOMEDRIVE %SYSTEMDRIVE% -m
    SETX HOMEPATH "\Documents and Settings\%USERNAME%" -m
    SETX HOMESHARE "\\<server>\<share>" -m
    SET HOME=%SYSTEMDRIVE%\Documents and Settings\%USERNAME%
    SETX HOME "%HOME%"
    SET TEMP=%HOME%\Local Settings\Temp
    SETX TEMP "%TEMP%"
    SETX TMP "%TEMP%"
    

Note: SETX variables are permanent, but are not available until after the script runs, so use SET to create temporary variables in your script. Also uses double quotes around the value you want to set your variable to in case it has spaces, but this is not necessary for SET. Machine variables are set with the -m option; user variable is the default. Windows 7 has many more options and uses /instead of -.

%systemdrive%是什麼東東啊?

引用自: pczone
Q: 所謂:本機硬碟的 %systemdrive%\Sysprep 資料夾中, 本機硬碟應是指c:吧, 而我不明白的是,%systemdrive%是什麼東東啊?且要把它建立在 C 的哪個目錄下才行呢?請各位前輩教教我,謝謝!!
A: 這意思應是在必須在 C:\ 下建立一個名為Sysprep 的資料夾吧…….預設的 %Systemdrive% 指的是 C:,進入 DOS 模式,使用 Set 指令,即可看到類似
Systemdrive=c:
Systemroot=c:\winnt
……..

微軟- 比較 NTFS 與 FAT 檔案系統, 還有UEFI型與BIOS型(Legacy)磁碟分割設定

$
0
0

比較 NTFS 與 FAT 檔案系統

http://windows.microsoft.com/zh-tw/windows-vista/comparing-ntfs-and-fat-file-systems
適用於 Windows Vista
檔案系統是電腦用來組織硬碟資料的基礎架構。如果您正在安裝新的硬碟,必須先 使用檔案系統進行分割和格式化,才能開始儲存資料或程式。在 Windows 中,有三個檔案系統選項可供選擇,分別為 NTFS、FAT32 以及較舊且較少使用的 FAT (又稱為 FAT16)。

NTFS:
NTFS 是此 Windows 版本慣用的檔案系統。它比早期的 FAT32 檔案系統擁有更多的優點,包括:

  • 自動從某些磁碟相關錯誤修復的功能,但 FAT32 沒有此功能。
  • 改善對大型硬碟的支援。
  • 更好的安全性,因為您可以使用權限和加密限制核准的使用者對特定檔案的存取。


FAT32:
FAT32 與較少使用的 FAT 都是用於舊版的 Windows 作業系統,包括 Windows 95、Windows 98 以及 Windows Millennium Edition。FAT32 沒有 NTFS 所提供的安全性,所以如果您的電腦上有 FAT32 磁碟分割或磁碟區,任何可存取您電腦的使用者都可以讀取其中的任何檔案。FAT32 也有大小的限制。您 無法在此 Windows 版本中建立大於 32GB 的 FAT32 磁碟分割,而且無法在 FAT32 磁碟分割上儲存大於 4GB 的檔案。

使用 FAT32 主要是因為您的電腦有時會執行 Windows 95、Windows 98 或 Windows Millennium Edition,其他時間則會執行此 Windows 版本,又稱為多重開機設定。如果是這種情況,您需要在 FAT32 或 FAT 磁碟分割上安裝舊版的作業系統,並確保它是主要磁碟分割 (裝載作業系統的磁碟分割)。使用這些舊版 Windows 時需要存取的任何其他磁碟分割也必須以 FAT32 格式化。這些舊版的 Windows 可存取網路上的 NTFS 磁碟分割或磁碟區,但不能存取您電腦上的 NTFS 磁碟分割或磁碟區。


了解磁碟分割

https://technet.microsoft.com/zh-tw/library/dd799232(v=ws.10).aspx

建議的 BIOS 型(Legacy)磁碟分割設定, 含系統復原

https://technet.microsoft.com/zh-tw/library/dd744364(v=ws.10).aspx
On legacy BIOS-based systems, the first sector of a partition is loaded into memory and execution is transferred to this code.
請考慮在系統磁碟分割或不同的修復磁碟分割中,安裝例如 Windows 修復環境 (Windows RE) 等復原工具,讓使用者能夠修復或重新安裝 Windows 而不需要刪除復原工具。安裝完成之後,您就可以設定 Windows 開機管理程式在 Windows 無法啟動時啟動復原工具。若要設定不同的修復磁碟分割,請設定下列磁碟分割類型,將修復磁碟分割識別成公用程式磁碟分割:

  • 在 Windows SIM 中:將 Microsoft-Windows-Setup\DiskConfiguration\Disk\ModifyPartition\TypeID 設成 0x27。
  • 在 DiskPart 工具建立和格式化磁碟分割後,使用命令 set id=27。

建議您將修復與公用程式磁碟分割放置在磁碟機的開頭。修復磁碟分割不會顯示在 Windows 檔案總管中。
下列範例中的設定包含主要修復磁碟分割、主要系統磁碟分割,以及主要 Windows 磁碟分割。


下表顯示在 Windows SIM 中用來設定此範例的設定 (在 Microsoft-Windows-Setup\DiskConfiguration\Disk 設定下)。

描述 建立磁碟分割:順序 建立磁碟分割:延伸 建立磁碟分割:大小 建立磁碟分割:類型 修改磁碟分割:順序 修改磁碟分割:# 修改磁碟分割:使用中 修改磁碟分割:格式 修改磁碟分割:標籤 修改磁碟分割:代號 修改磁碟分割:TypeID
復原工具 (例如 Windows RE) 1 自訂 Windows 復原映像的大小 主要 1 1 NTFS 復原 R 0x27
系統磁碟分割 2 300 主要 2 2 true NTFS 系統 S
Windows 3 true 主要 3 3 NTFS Windows W

我的電腦實際狀況:
就跟上面的分隔式一樣的, 所以我的電腦應是使用Legacy方式開機, 因為若是EFI方式開機的話, 一定會有一塊FAT32的分隔磁區負責開機!
指令介面:

圖式化:

建議的 UEFI 型磁碟分割設定

https://technet.microsoft.com/zh-tw/library/dd744301(v=ws.10).aspx
預設設定: 若為全新安裝,Windows 安裝程式預設會建立可延伸韌體介面系統磁碟分割 (EFI 系統磁碟分割或 ESP)、Microsoft(R) 保留的磁碟分割 (MSR) 以及主要 Windows 磁碟分割。
而開機應該就是透過這個(EFI 系統磁碟分割或 ESP)去boot起來, 再將控制權給主要Windows磁碟分割

此表格顯示磁碟分割結構:

描述 PartitionID 大小 磁碟分割類型 格式 磁碟機代號
EFI 系統磁碟分割 (ESP) 1 100 MB EFI FAT32
MSR 磁碟分割 2 128 MB MSR
Windows 3 磁碟的剩餘空間 主要 NTFS W

Windows Registry Editor 的修改範例 –匯出/新增/更新/刪除

$
0
0

(出處:The Will Will Web) 操作登錄項目(Registry)是Windows RD經常做的事情,所以也會累積不少登錄檔(*.reg)隨時可供設定或移除,以下為範例!

匯出登錄機碼

無論如何,在測試修改機碼之前最好還是先備份一下,以一整個 “機碼" 為單位匯出(左側的每個資料夾都叫做機碼或稱子機碼),匯出成 *.reg 檔後,日後若改錯或出問題時,點兩下即可修復機碼。
登錄編輯程式 :: 匯出登錄項目

匯出後的格式像以下這樣,而我就是經常設定這種 *.reg 的檔案幫我更新、刪除一些系統常用機碼設定:

Windows Registry Editor Version 5.00

[HKEY_CURRENT_USER\Software\Microsoft\Internet Explorer\SearchScopes]
"DefaultScope"="{05C72334-11F3-4e9f-8740-98128F52EFB9}"
"Version"=dword:00000001

[HKEY_CURRENT_USER\Software\Microsoft\Internet Explorer\SearchScopes\{xxxx-xxxx}]
"DisplayName"="Google"
"URL"=http://www.google.com/search?hl=zh-TW&esrch=BetaShortcuts&q={searchTerms}&lr=

新增或更新機碼值

我這陣子處理了許多開發環境的問題,其中幾天前講的 [ 安裝 Visual Studio .NET 2003 開發主機筆記 ] 就有提到如何解決 [HTTP – 401.1 未授權登入失敗] 的問題,這問題基本上只要新增一個機碼就能夠解決,而我就將這個「新增機碼」的動作儲存成 *.reg 檔,以後有其他電腦要設定環境時,直接 Double Click 就可以解決問題。

像這個問題需要在 HKEY_LOCAL_MACHINE\SYSTEM\CurrentControlSet\Control\Lsa 機碼中新增一筆 DisableLoopbackCheck 的 DWORD 值,假設檔名我取成 Set-DisableLoopbackCheck.reg 內容如下:

Windows Registry Editor Version 5.00

[HKEY_LOCAL_MACHINE\SYSTEM\CurrentControlSet\Control\Lsa]
"DisableLoopbackCheck"=dword:00000001

備註:若「機碼」本身不存在,執行 *.reg 的時候會自動建立所有不認識的機碼,無須在特別另外建立。

刪除機碼值

如上一個範例,若要將 DisableLoopbackCheck 的 DWORD 值刪除,就可以用以下語法進行刪除:

Windows Registry Editor Version 5.00

[HKEY_LOCAL_MACHINE\SYSTEM\CurrentControlSet\Control\Lsa]
"DisableLoopbackCheck"=-

這裡的重點就是設定值的地方要設定成一個減號 ( – ),這就代表著「刪除」的意思。

刪除登錄機碼

跟身除機碼值不同,刪除機碼將會連同機碼、機碼值、與所有子機碼都一併刪除,算是個殺傷力相當大的語法,必須小心使用。
若你想將 Visual Studio 2008 最近開啟的專案(Recent Projects)全部清空的話,可以利用以下 reg 檔直接刪除機碼並重建機碼。

Windows Registry Editor Version 5.00

[-HKEY_CURRENT_USER\Software\Microsoft\VisualStudio\9.0\ProjectMRUList]
[HKEY_CURRENT_USER\Software\Microsoft\VisualStudio\9.0\ProjectMRUList]

如何執行 .reg檔讓修改得以實現

簡單的方法是直接按兩下執行, 而automation的工程師需要用Script的方式自動去跑, 方式如下:
以Set-DisableLoopbackCheck.reg為例

rem modify registry DisableLoopbackCheck value to dword:00000001
regedit /s Set-DisableLoopbackCheck.reg
TIMEOUT /T 15

DevCon 或 DevCon64 可以啟用、 停用、 重新啟動、 更新、 移除,和查詢個別裝置群組。

$
0
0

DevCon 公用程式是一個命令列公用程式,做為 [裝置管理員的替代。 使用 DevCon,您可以啟用、 停用、 重新啟動、 更新、 移除,和查詢個別裝置群組。

Windows Device Console (Devcon.exe)

https://msdn.microsoft.com/zh-tw/library/ff544707(v=vs.85).aspx
DevCon (Devcon.exe), the Device Console, is a command-line tool that displays detailed information about devices on computers running Windows. You can use DevCon to enable, disable, install, configure, and remove devices.
DevCon runs on Microsoft Windows 2000 and later versions of Windows.

What you can do with DevCon

Windows driver developers and testers can use DevCon to verify that a driver is installed and configured correctly, including the proper INF files, driver stack, driver files, and driver package. You can also use the DevCon commands (enable, disable, install, start, stop, and continue) in scripts to test the driver.

DevCon is a command-line tool that performs device management functions on local computers and remote computers.
(Note: To run DevCon commands on a remote computer, the Group Policy setting must allow the Plug and Play service to run on the remote computer. On computers that run Windows Vista and Windows 7, the Group Policy disables remote access to the service by default. On computers that run WDK 8.1 and WDK 8, the remote access is unavailable.)

Devcon features include:

  • Display driver and device info:  DevCon can display the following properties of drivers and devices on local computers, and remote computers (running Windows XP and earlier):
    • Hardware IDs, compatible IDs, and device instance IDs. These identifiers are described in detail in Device Identification Strings.
      Device setup classes
      The devices in a device setup class
      INF files and device driver files
      Details of driver packages
      Hardware resources
      Device status
      Expected driver stack
      Third-party driver packages in the driver store
  • Search for devices:  DevCon can search for installed and uninstalled devices on a local or remote computer by hardware ID, device instance ID, or device setup class.
  • Change device settings :  DevCon can change the status or configuration of Plug and Play (PnP) devices on the local computer in the following ways:
    • Enable a device
    • Disable a device
    • Update drivers (interactive and noninteractive)
    • Install a device (create a devnode and install software)
    • Remove a device from the device tree and delete its device stack
    • Rescan for Plug and Play devices
    • Add, delete, and reorder the hardware IDs of root-enumerated devices
    • Change the upper and lower filter drivers for a device setup class
    • Add and delete third-party driver packages from the driver store
  • Restart the device or computer : DevCon can restart a local device, reboot the local system on demand, or reboot the local system if required for another DevCon operation.

Windows- Blue Screen藍屏當機畫面的基本分析方式

$
0
0

Win7藍白畫面(藍屏) 問題搜尋法
(轉錄自: PTT)
藍白畫面發生時常使人慌亂 尤其是神出鬼沒的發生時(Win7近來常見) 由於個電腦的差異性 如 硬體 軟體 組合之不同 即使 換硬體 升Driver 爬Google代碼 也不一定能確切抓出問題點 當藍白當機問題頻率低(難和店家要求換貨,且責任硬體軟體難確定) Google代碼也常因個人配備,OS,Driver不同 而難以鎖定問題目標 且板友難幫忙 故目前的技術論壇除錯法傾向將.dmp檔上傳 以供熱心網友解析 PS. 所謂.dmp檔 是發生STOP狀況(藍白畫面)時 Windows自動傾印的記錄檔 通常儲存在 C:\Windows\Minidump\*.dmp 和 C:\Windows\MEMORY.dmp


———–以下是自行分析dmp檔的辦法(for Win7,XP為最底下視頻)————–

Step.0 怎麼知道到底何時?為何?當機

開始 -> (搜尋程式及檔案)中填入"事件檢視器" -> 執行之
左側分頁內 -> 選"事件檢視器(本機)" -> “系統管理事件摘要"欄中 -> “重大" 和 “錯誤" 項 (藍屏問題記錄在此) -> 雙擊 某問題分類 列出發生時間並檢視代碼和傾印檔

Step.1 怎麼看.dmp檔?

到此 http://www.microsoft.com/whdc/DevTools/Debugging/default.mspx 進入"Download Debugging Tools from the Windows SDK"這鏈結 ( http://go.microsoft.com/fwlink/?LinkID=191420 ) 下載 Winsdk_web 安裝時 其他不用選 只選 “Dubugging Tools for Windows"進行線上安裝 開始 -> 所有程式 -> Dubugging Tools for Windows -> Windbg File -> Open Crash Dump (選擇要開的.dmp檔) 列出的紀錄中 有鏈結字樣"!analyze -v" 點選可列出更細部資訊 ( 在此可用ctrl+F 搜尋在藍白畫面看到的關鍵字 以看到哪個軟硬體出問題 並了解問題代碼的意義 )

如何使用微軟的Debugging Tools分析記憶體傾印檔(Crash Dump File),以判斷Windows系統運作失敗的可能原因?
(出處: 這裡 03/23/2012)
Windows系統會突然出現當機、自動重開機或藍底白字(藍屏)的異常狀況,原因可能是系統設置錯誤、軟體異常、硬體故障或驅動程式異常等各種嚴重異常,導致Windows系統無法繼續運行。由於發生當機的原因很多,因此需要取得更多故障訊息來解決當機問題,當系統運行失敗時,系統會將記憶體傾印檔記錄下來,使用微軟的Debugging Tools分析記憶體傾印檔,可以協助判斷可能原因,請參考下述步驟說明。

1. 在Windows XP/Vista/7系統的【系統內容】→【進階】頁籤下的【啟動及修復】設定視窗中,預設會把系統失敗的偵錯資訊寫入記憶體傾印檔(如下圖)。

2. 參考上圖畫面設定,預設在C:\WINDOWS\Minidump或MEMORY.DMP可以找到記憶體傾印檔,後述步驟以「小記憶體傾印」為例。

比較差異: Differences between full memory dump files and mini memory dump files(出處)
A memory dump file can collect a variety of information. Typically, a support engineer must have all the contents of virtual memory to troubleshoot a problem. In other cases, you might want to capture less information to focus on a specific problem. The debugger is flexible. This flexibility lets you limit the information that a memory dump file captures by collecting either full memory dump files or mini memory dump files:

Full memory dump files.
These files contain the contents of virtual memory for a process. These files are the most useful when you are troubleshooting unknown issues. A support engineer can use these files to look anywhere in memory to locate any object, pull up the variable that was loaded on any call stack, and disassemble code to help diagnose the problem. The disadvantage of full memory dump files is that they are large. It also may take additional time to collect these files, and the process that is being recorded must be frozen while the dump file is created.

Mini memory dump files.
A mini dump file is more configurable than a full dump file and can range from only several megabytes (MB) up to the size of a full dump file. The size differs because of the amount of virtual memory that the debugger is writing to disk. Although you can gather mini memory dump files quickly and they are small, they also have a disadvantage. Mini dump files may contain much less information than full dump files. The information that a mini dump file gathers may be virtually useless to a support engineer if the area of memory that the support engineer has to troubleshoot was not captured. For example, if the heap memory is not written to the memory dump file, a support engineer cannot examine the contents of a message that was being processed at the time that the problem occurred. Useful information, such as the subject line and the recipient list, would be lost.

3. 點我造訪微軟網站下載Debugging Tools來安裝,執行【WinDbg】。

4. 點擊【File】→【Open Crash Dump】。

5. 選擇記憶體傾印檔。

6. 詢問是否儲存相關資訊,按Yes或No皆可。

7. 分析完成會看到一行【Probably caused by : 檔案名稱】的訊息,表示當機原因可能與這個檔案有關,搜尋電腦中的檔案或入口網站來查詢該檔案來自於什麼程式,如果您剛好設定過這個程式沒多久後就出現當機問題,就能針對該程式檢察來解決當機問題。

Step.2 看到了問題如何排除?

除了將搜尋到的資料Google 更建議到微軟技術服務 http://support.microsoft.com/search/?adv=1 下拉選單 選擇OS 後 再填入關鍵字搜尋 會發現 很多問題其實都已經有解決方案(即使不是終極的 也有暫時的) 舉個例: http://support.microsoft.com/kb/974410/zh-tw http://support.microsoft.com/kb/816036/zh-tw 都算是問題的詳解 有些問題 甚至還有未正式發布的修正檔(Hotfix)可嘗試 但要一定要"特別注意"的是 所謂的 Hotfix 是針對單一獨立問題的修正檔 也就是每個頁面的 Hotfix 都是不一樣的 “必需確定完全符合"該問題再裝 因為這些修正檔 只能算 Service Pack 的beta檔 相容性和安全性微軟不保證 由於非完全正式公開 如需要 按下鏈結 填入mail 微軟會寄一個下載連結給你

imagex 的使用教學介紹 –擷取、修改及套用映像

$
0
0

(參考微軟教學網頁), 然整理如下:

什麼是 ImageX?

ImageX 是一套命令列工具,可讓原始設備製造商 (OEM) 與企業擷取、修改及套用以檔案為基礎的磁碟映像,以利快速部署。 ImageX 可與 Windows 映像檔案 (.wim) 搭配使用,將檔案複製到網路,也可以與使用 .wim 映像的其他技術搭配使用,例如 Windows 安裝程式、Windows 部署服務 (Windows DS) 以及 System Management Server (SMS) 作業系統功能部署套件。

ImageX 如何運作

ImageX 是從一組 API (稱為 Windows 的映像 API) 組建的映像工具。ImageX 的主要目的是擷取、修改及套用映像,以部署於製造商或公司的 IT 環境中。ImageX 支援新的 Microsoft Windows 映像 (.wim) 格式。

ImageX 結構: ImageX 會依賴數個元件,包括 ImageX 執行檔 (ImageX.exe)、WIM 檔案系統篩選器 (Wimfltr.sys 及 Wimfltr.inf)、WIM API 集,以及 .wim 檔案格式。下圖顯示這些元件之間的互動。

ImageX 命令列選項

ImageX 是 Windows Vista 的命令列工具,可用來建立及管理 Windows 映像 (.wim) 檔案。.wim 檔案包含一或多個磁碟區映像、包含已安裝之 Windows 作業系統映像的磁碟區。

若要修改磁碟區映像,您必須在執行 Windows XP Service Pack 2 (SP2)、Windows Server 2003 Service Pack 1 (SP1) 或 Windows Vista 的電腦上,安裝 Windows 映像檔案系統篩選器 (WIM FS 篩選器) 驅動程式。安裝 WIM FS 篩選器驅動程式可讓您將 .wim 檔案當成目錄一樣掛接,而且不用解壓縮或重新建立映像,就能在檔案管理工具 (例如 Windows 檔案總管) 中瀏覽、複製、貼上及編輯磁碟區映像。

mageX 命令列選項的用法如下:
imagex [flags] {/append | /apply | /capture | /delete | /dir | /export | /info | /split | /mount | /mountrw | /unmount} [parameters]

下列清單會顯示每個 imagex 作業類型所用的有效語法:

  • imagex /append image_path image_file {“description"} {/boot | /check | /configconfiguration_file.ini | /scroll | /verify}
    將磁碟區映像附加到現有的 Windows 映像 (.wim) 檔案。建立檔案的單一例項、將其與 .wim 檔案中已存在的資源相比較,讓您不致於重複擷取同一個檔案。
    • ex: imagex /append d:d:\imaging\data.wim “Drive D" /verify
  • imagex /apply image_file image_number image_name image_path {/check | /ref | /scroll | /verify}
    將磁碟區映像套用到指定的磁碟機。
    • ex: imagex /apply d:\imaging\data.wim 1 d:\New_Directory /verify
  • imagex /capture image_path image_file “name" {“description"} {/boot | /check | /compress [type] | /config | /flags “EditionID" | /norpfix | /scroll | /verify}
    將來自磁碟機的磁碟區映像擷取到新的 .wim 檔案。擷取的目錄會包含所有的子資料夾及資料。您無法擷取空的目錄。目錄必須至少包含一個檔案。
    • ex: imagex /capture d:d:\imaging\data.wim “Drive D" /verify
    • ex: imagex /compress fast /flags “Ultimate" /check /scroll /capture c:d:\install.wim “Windows Vista Ultimate"
  • imagex /delete image_file image_number image_name {/check}
    從含有多個磁碟區映像的 .wim 檔案中,刪除指定的磁碟區映像。此選項只會刪除中繼資料項目及 XML 項目。它不會刪除串流資料,也不會最佳化 .wim 檔案。
    • ex: imagex /delete d:\imaging\data.wim 1
  • imagex /dir image_file image_number image_name
    顯示指定之磁碟區映像內檔案及資料夾的清單。
    • ex: imagex /dir d:\imaging\data.wim 1
  • imagex /export src_file src_number src_name dest_file dest_name {/boot | /check | /compress [type] | /ref [splitwim.swm]}
    將指定之 .wim 檔案的複本匯出至其他的 wim. 檔案。來源及目的檔案必須使用同一個壓縮類型。您也可以匯出至新的映像檔案,將映像最佳化。當您修改映像時,ImageX 會儲存其他資源,使得映像整體大小增加。匯出映像會移除不必要的資源檔案。
    • ex: imagex /export d:\imaging\data.wim d:\imaging\sample.wim 1
  • imagex /info img_file[img_number | img_name] [new_name] [new_desc] {/boot | /check}
    傳回針對指定 .wim 檔案所儲存的 XML 描述,包括 (但不限於) 檔案大小總計、映像索引編號、目錄計數、檔案計數及描述。
    ex: imagex /info d:\imaging\data.wim
  • imagex /mount image_file image_number image_name image_path {/check}
    從 Microsoft Windows XP Service Pack 2 (SP2)、Microsoft Windows Server 2003 Service Pack 1 (SP1) 或 Windows Vista 掛接具有唯讀權限的 .wim 檔案至指定的目錄。檔案一經掛接之後,您便可檢視 (但不能修改) 目錄中包含的所有資訊。
    • ex: imagex /mount d:\imaging\data.wim 2 c:\mounted_images
  • imagex /mountrw image_file image_number image_name image_path {/check}
    從 Microsoft Windows XP Service Pack 2 (SP2)、Microsoft Windows Server 2003 Service Pack 1 (SP1) 或 Windows Vista 掛接具有讀取/寫入權限的 .wim 檔案至指定的目錄。檔案一經掛接之後,您便可檢視及修改目錄中包含的所有資訊。
    • ex: imagex /mountrw d:\imaging\data.wim 2 c:\mounted_images
  • imagex /split image_file dest_file size {/check}
    將現有的 .wim 檔案分割為多個唯讀分割 .wim 檔案 (.swm)。
    • ex: imagex /split d:\imaging\data.wim 600
  • imagex /unmount image_path {/commit}
    取消掛接指定目錄中的已掛接映像。
    • ex: imagex /unmount /commit c:\mounted_images


/verify 及 /check 支援 .wim 檔案的檔案驗證及資料完整性

在套用作業期間,/verify 及 /check 選項會影響效能。建議您使用 /verify 及 /check 兩個選項以獲得最佳的映像驗證及資料完整性。

  • /verify 選項: 會驗證快取寫入並檢查錯誤及檔案重複。/verify 選項不支援磁碟清除、寫出或略過系統快取。在擷取作業期間,/verify 選項會讀回擷取的檔案,並依每個位元組與原始所擷取檔案進行比較。在套用作業期間,/verify 選項會重新雜湊套用的檔案,並與在擷取作業期間所產生的雜湊進行比較。
  • /check 選項: 是專為偵測 .wim 檔案的損毀而設計。如果未在擷取作業期間設定 /check 選項,則在套用作業期間會忽略旗標。在擷取作業期間,/check 選項會對 .wim 檔案以每 10 MB 資料區塊的方式產生及儲存一系列的雜湊。在套用作業期間,/check 選項會對在擷取作業期間所儲存的雜湊進行雜湊並驗證這些 10 MB 的區塊。

ImageX 錯誤碼

  • 0 成功
  • 1 命令列選項無效
  • 2 WIMGAPI 失敗
  • 3 設定指令碼無效
  • 4 拒絕存取,需要系統管理員權限

什麼是.wim檔 ?

http://eeepage.info/windows-imaging-file-format-wim/

什麼是.wim檔案? Windows Imaging File Format (WIM)

$
0
0

本主題介紹 Microsoft Windows 映像 (WIM) 檔案格式。WIM 是 Windows Vista 中所推出,以檔案為基礎的磁碟映像格式。WIM 檔案屬於壓縮的封裝,包含許多相關的檔案。WIM 檔案的格式經過最佳化,使用 LZX 可得到最大壓縮、使用 XPRESS 可得到快速壓縮,或者不壓縮。

WIM 檔案結構

WIM 檔案結構共包含六種資源:標題、檔案資源、中繼資料資源、查閱資料表、XML 資料及完整性資料表。以下插圖顯示包含兩個映像之 WIM 檔案的一般配置。

WIM File Structure

WIM 檔案配置

  • WIM 標題:定義 .wim 檔案的內容,包括關鍵資源 (中繼資料資源、查閱資料表及 XML 資料) 的記憶體位置,以及各種 .wim 檔案屬性 (版本、大小及壓縮類型)。
  • 檔案資源:包含擷取之資料的一系列封裝,例如來源檔案。
  • 中繼資料資源:包含您所擷取之檔案的相關資訊,包括目錄結構與檔案屬性。.wim 檔案中每一個映像都有一個中繼資料資源。
  • 查閱資料表:包含 .wim 檔案中之資源檔案的記憶體位置。
  • XML 資料:包含映像的其他資料。
  • 完整性資料表:包含在套用操作中用於驗證映像之完整性的安全性雜湊資訊。

3


Windows 自動化安裝套件 (Windows AIK) –教學與介紹

$
0
0

Windows AIK 概觀

Windows(R) 自動化安裝套件 (AIK) 是您用來自動化部署 Windows 作業系統之工具和文件的集合。AIK 是您可用來部署 Windows 之數種資源的其中一種。
AIK 適用於高度自訂的環境。AIK 中的工具可讓您設定許多部署選項,同時還提供高度的彈性。每家公司的公司部署環境都不一樣。視您的商務需求和資源而定,您可以選擇使用 AIK 中提供的所有或部分資源。
其他 Windows 部署工具與資源包括下列各項:

  • Microsoft Deployment Toolkit。這些工具提供完整自動化部署 Windows 作業系統。‎‎‏Microsoft Deployment Toolkit 可以減少部署時間、標準化 Windows 映像、限制服務中斷、降低部署後支援部門成本以及改進安全性與持續進行的設定管理。如需詳細資訊,請參閱桌面部署 TechCenter (可能為英文網頁)。
  • 應用程式相容性工具組。 這些工具可讓您在環境中部署新版 Windows 或 Internet Explorer(R) 之前先評估並減少應用程式相容性問題。如需相關資訊,請參閱 Microsoft 應用程式相容性工具組 5.0 (可能為英文網頁)
  • Microsoft Assessment and Planning Toolkit Solution Accelerator。 此工具可讓您評估您目前的 IT 基礎結構是否可進行各種技術移轉專案。它包含之前附隨 Windows Vista(R) Hardware Assessment Solution Accelerator 提供的功能。如需相關資訊,請參閱 Microsoft Assessment and Planning Toolkit (可能為英文網頁)

AIK 工具
根據預設值,AIK 會安裝在 C:\Program Files\Windows AIK 目錄。這個目錄含有此版本所包含的所有工具和文件。大部分 Windows 部署案例使用的核心工具包括:

  • Windows 系統映像管理員 (Windows SIM)
    此工具用來開啟 Windows 映像、建立回應檔案以及管理發佈共用與組態集。
  • ImageX
    此工具用來擷取、建立、修改以及套用 Windows 映像。
  • 部署映像服務與管理 (DISM)
    此工具用來將更新、驅動程式以及語言套件套用至 Windows 映像。DISM 可用於 Windows 7 和 Windows Server 2008 R2 的所有安裝。
  • Windows 預先安裝環境 (Windows PE)
    這是一種用來部署 Windows 的最基本作業系統環境。AIK 包含可用來建置和設定 Windows PE 環境的數種工具。
  • Windows 安裝程式
    此工具用來安裝 Windows。此工具包含於 Windows 產品 DVD 中,而不是 AIK 安裝的一部分。
  • Sysprep
    此工具用來準備要製作映像或交付給客戶的 Windows 安裝。Sysprep 工具提供於所有 Windows 安裝的 %WINDIR%\system32\sysprep 目錄中。
  • 使用者狀態移轉工具 (USMT)
    此工具用來將舊版 Windows 作業系統上的使用者資料移轉至 Windows 7。USMT 會安裝為 AIK 的一部分,安裝於 %PROGRAMFILES%\Windows AIK\Tools\USMT 目錄。如需 USMT 的相關資訊,請參閱《使用者狀態移轉工具使用者手冊》(Usmt.chm)。

下載

設置編譯環境 –安裝WDK與Windows driver kit

修正visual studio 的 “Some bytes have been replaced with the Unicode substitution character while loading file"

$
0
0

剛安裝visual studio去編譯, 發現以下錯誤:

Some bytes have been replaced with the Unicode substitution character while loading file C:\Users\xxxxxxxx\1305376\VariableBinder.cs with Unicode (UTF-8) encoding. Saving the file will not preserve the original file contents.

參考自這裡

大致上是說你的一些檔案被修改且取代了, 所以內容變得很奇怪visual studio無法編譯…

這個問題可能發生在各版本,

visual studio 2010 2013 2015, 因為跟系統的設置有關係啦…

解法:

Just ran into similar issue and found a way to fix it:

  1. Open “Region" from Control Panel
  2. Choose “Administrative" tab
  3. Check if  your “Language for non-Unicode programs" is any UTF-8 or Unicode language that other than English.
  4. If so, please click “Change system locale…" and change it to English.
  5. It then works after locale change and rebooting.

Boot Process 與命令列工具BCDEdit用於管理 BCD (開機設定資料)存放區

$
0
0

提到bcdedit, 大部分就是跟bios,多重開機,secure boot,winPE,…etc有點關係, 因為 bcdedit就是去編輯BCD資料的指令! 所謂的開機設定資料 (BCD) 檔案, 就是提供一個存放區, 可用於說明開機應用程式和開機應用程式設定。所以說 BCDEdit 為命令列工具, 可用於管理 BCD 存放區。它可用於各種不同的目的,包括建立新的存放區、修改現有的存放區、新增開機功能表選項等。BCDEdit 本質上可提供與舊版 Windows 上之 Bootcfg.exe 相同的目的,但有兩項重大改進:
BCDEdit 顯示比 Bootcfg.exe 範圍還要廣泛的開機選項。

開機管理程式設定

Windows 開機管理程式位於識別元 {bootmgr} 下的 device 與 path 設定,必須指向正確的磁碟分割與可執行檔。其他設定可以參考修改 BCD 存放區範本
在 Windows Vista 的 BCD 範本中,有如下的這些設定:

Windows 開機管理程式
--------------------
identifier              {bootmgr}
device                  partition=C:
path                    \EFI\Microsoft\Boot\bootmgfw.efi
description             Windows Boot Manager

在 Windows Server 2008 的 BCD 範本中,有如下的這些設定:

Windows 開機管理程式
--------------------
identifier              {bootmgr}
device                  partition=\Device\HarddiskVolume1
path                    \EFI\Microsoft\Boot\bootmgfw.efi
description             Windows Boot Manager

兩種模式(Legacy 32bits / UEFI 64bits )的 bcd檔:

  • Legacy 32bits
    • C:\boot\bcd
  • UEFI 64bits
    • C:\elf\microsoft\boot\bcd
  • 或是兩種皆支援的hybrid mode

(出處:Repair Windows BCD – Windows 10/8.1/7/Vista)
In Windows Vista, Windows 7, Windows 8/8.1 and Windows 10 the System Boot Configuration Data (BCD) is stored in a file in folder “\Boot".

The full path to this file is “[active partition]\Boot\BCD“.
(On UEFI/GPT the full path is “[EFI system partition]\EFI\Microsoft\Boot\BCD“)

Windows NT6 (Vista, Windows 7/8/10) BIOS/MBR boot process depends on the presence of an active partition on hard disk.
(On UEFI/GPT boot process depends on the presence of EFI System Partition(ESP) on hard disk)

BIOS/MBR boot process from hard disk goes like this:

  1. BIOS firmware initialization and self test (Power On Self Test – POST)
  2. load and execution of MBR (Master Boot Record) on first disk
  3. load and execution of partition boot record (PBR) on active partition
  4. load and execution of boot manager (“\bootmgr") from active partition and then display of boot menu (skipped if only one boot entry)
  5. load and execution of Windows NT6 loader – file “winload.exe" from \Windows\System32 folder
  6. load and execution of kernel and drivers

The active partition (also a primary partition) can be mapped to a drive letter like c:, d: or be the unmapped “System Reserved" partition. You can use Disk Management or diskpart.exe to view and set the active partition.

If BCD resides on an unmapped active partition the full path is “\Device\HarddiskVolumeN\Boot\BCD" where N is a number starting from 1. If active partition is mapped to c: drive then the full path to system BCD is “c:\Boot\BCD".

UEFI/GPT boot process from hard disk goes like this:

  1. UEFI firmware initialization
  2. load and execution of first boot candidate (first entry in NVRAM boot order – usually Windows firmware boot manager(\EFI\Microsoft\Boot\bootmgfw.efi))
    no master(MBR) and partition boot record(PBR) code used!
  3. display of Windows boot menu (skipped if only one boot entry)
    (it is not clear what’s the purpose of Windows boot manager (“\EFI\Microsoft\Boot\bootmgr.efi") – should be investigated)
  4. load and execution of Windows NT6 loader – file “winload.efi" from “\Windows\System32″ folder
  5. load and execution of kernel and drivers

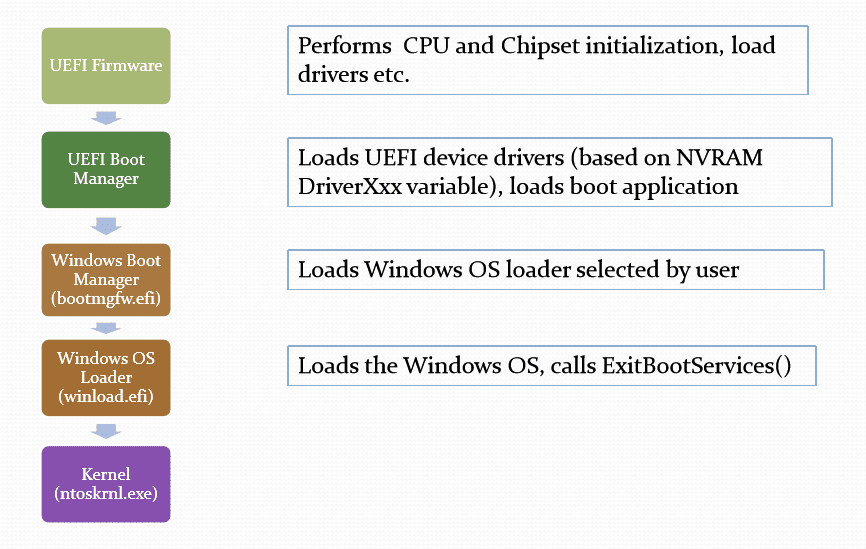
And here a visualization of Windows UEFI boot process from an UEFI Plugfest – Windows boot environment by Murali Ravirala from Microsoft.

轉錄-Boot Process and BCDEdit

(出處)The new boot environment supports both BIOS and Unified Extended Firmware Interface (UEFI) firmware models. It uses a new data store for boot configuration data (the BCD store) that replaces Boot.ini and provides new boot applications that replace the previous Windows® loader (Ntldr.exe), including a new Windows boot manager and Windows boot loader.

What does the boot process do?
When a computer is turned on, it must perform a variety of tasks before it is ready to start running applications. To accomplish these tasks, the computer runs startup software that resides in the firmware. This software (a “boot loader") locates and initializes the operating system kernel and prepares access to hardware devices before the operating system is ready to start running applications. The boot loader is typically independent of a specific operating system, but it can locate the code to start the next step, which is the operating system–specific phase of system startup. The boot loader and related boot configuration information is often stored in system files that are separate from the operating system, application programs, and user data.

Are there any special considerations?
You must have administrative rights to change the boot configuration for Windows. To change the boot configuration, start the boot configuration application BCDEdit.exe from a command prompt with administrative rights. Be aware that changing the boot configuration can make the system unable to start. To avoid problems with this, make a backup copy of the current boot configuration ahead of time by using the bcdedit /export save-bcd command.

Support for both BIOS and UEFI firmware
UEFI is the next generation of firmware architecture that is designed to replace the BIOS architecture. The new Windows boot environment is designed for both BIOS and UEFI and uses a common data store that can exchange boot configuration information between the firmware, the boot loader, and boot applications.

New boot applications
The functionality that was previously combined in Ntldr.exe is now separated into multiple applications:

  • Windows Boot Manager (Bootmgr.exe or Bootmgr.efi). This application is independent of the operating system and uses the firmware to load the Windows boot loader either from a particular disk partition or over a network connection (in the case of network boot).
  • Windows Boot Loader (Winload.exe or Winload.efi). This application is part of the operating system and loads a specific version of Windows. It uses the firmware to load the operating system kernel and to boot critical device drivers from a local hard disk.
  • Windows Resume (Winresume.exe or Winresume.efi). Windows Resume finds a hibernation image and then uses the firmware to read the hibernation file into RAM and to resume the operating system from the hibernation state.

The Windows boot environment also includes the Windows Memory Tester (Memdiag.exe or Memdiag.efi). You can start this diagnostic tool from the boot manager to verify that RAM is working correctly.

New data store that replaces Boot.ini
The Boot Configuration Data (BCD) store replaces the text-based Boot.ini file. In the BCD store, the Windows boot manager, the Windows boot loader, and other boot applications are represented as program objects (GUIDs) instead of text items. A new tool, BCDEdit.exe, enables you to use basic and extended commands to modify these objects in order to control all aspects of the boot process. Although the data store represents each object with a GUID, some objects have alias names for common use, such as {bootmgr} (which refers to boot manager) and {default} (which refers to the default Windows boot loader). Applications can modify boot configuration data by using a new BCD Windows Management Instrumentation (WMI) provider.

You can use the standard system application Msconfig.exe to provide a graphical interface for viewing and modifying a subset of the boot configuration settings. You must run Msconfig.exe with administrative rights.


轉錄-修改windows7啟動項的詳細步驟

(出處)發現win7下無法像XP下直接修改C:/boot.ini即可,需要在管理員權限下使用bcdedit命令操作。記錄如下:
Bcdedit簡介

  • 在NT60系列操作系統(Windows 7/Vista/2008)中的一個命令行工具,用於建立和重新配置bootloader,後者無須再使用boot.ini文件。
  • 也就是說,使用BCDEdit這個工具,能夠修改NT60 系列系統的啟動菜單在之前基於NT50系列(Windows XP/2000/2003)的Windows系統中,Windows使用Ntldr作為Boot Loader來啟動系統,但在新的NT60系列系統中,微軟引入瞭一種全新的boot loader架構,Windows Boot Manager (Bootmgr.exe)。
  • 與Ntldr嚴重地依賴於硬件不同的是,NT60中的新架構可以實現完整的硬件獨立性,且能夠與多種操作系統無縫結合,讓NT60的啟動/引導過程更加快速與安全。
  • 同時,將之前Windows 系統中由Boot.ini管理的內容移交給新的Boot Configuration Data (BCD : 啟動設置數據),當然,也提供瞭新的啟動選項編輯工具,BCDEdit (BCDEdit.exe),來管理啟動設置。
  • ——所謂boot loader,在指在內核運行之前執行的一段小程序,系統通過它來初始化硬件設備、建立內存空間的映射圖等,將系統的軟硬件環境設置成一個合適的狀態,為最終調用操作系統內核準備好正確的環境。
  • ——在啟動過程中,Ntldr 使用Boot.ini 文件來確定在啟動/引導過程中要顯示哪些操作系統選項,我們對啟動選項的設置可以通過修改boot.ini文件中相應內容實現。
  • Windows NT60 (Windows 7/Vista/2008)與早期NT52 系列系統(Windows XP/2000/2003)啟動的對比
    • 在傳統的基於BIOS的計算機中,如果只安裝NT60 系列操作系統(Windows 7/Vista/2008),您將會發現Boot.ini 文件已經徹底從系統中消失;如果系統中安裝瞭NT60 和之前的Windows 系統,如NT52 系列操作系統 (Windows XP/2000/2003),雖然仍可找到Boot.ini 文件,不過,這個文件只作用於那些系統,而不會對NT60 的啟動有任何影響。
    • 而在基於EFI (Extensible Firmware Interface : 可擴展固件接口,以後采用這種接口的PC會越來越多)的計算機中,Boot.ini 文件則更不復存在,在基於EFI的系統中,啟動選項被貯存在主板的存儲器中。此時要修改啟動選項,要麼通過能夠讀寫NVRAM的工具如NvrBoot,要麼使用上文提到的BCDEdit。
    • 由此可見,在NT60中,想要再像之前NT52 中那樣通過一個簡單的文本編輯器來修改Boot.ini(或用NT52自帶工具Bootcfg)的方式來管理啟動選項已經不可能瞭,要對啟動設置進行修改,只能使用命令格式相對要復雜得多的BCDEdit。
  • 此外,微軟也在NT60 中提供瞭可通過WMI (Windows Management Instrumentation : Windows管理規范)調用的BCD 類,通過它可以用編程的方式修改BCD數據。不過,相信對絕大多數根本不會接觸編程的用戶而言,這更是不可能的任務。

BCDEdit 使用前註意

  • 1.工具性質: command line tool
    • 需要註意的是,BCDEdit不是一個運行於圖形界面下的程序,而是一個命令行工具,該文件(Bcdedit.exe) 位於 “\Windows\System 32”目錄下。
  • 2.啟動
    • 要執行BCDEdit,首先應進入命令行窗口,並要將操作用戶並提升至管理員權限。另外,該工具依賴於參數,如果不帶參數,則不能正常使用。
    • 在命令行窗口中,轉到系統目錄如 “C:/windows/system32”下,然後輸入“bcdedit <參數>” 即可。也可直接在任意目錄運行,因為System32目錄本身在環境變量“Path”的范圍內。
  • 3.BCDEdit命令核心
    • (1)幫助
      • bcdedit /? : 顯示全部的命令幫助(都隻是概述)。
      • bcdedit.exe /? <命令> : 顯示指定命令參數的詳細信息(無需帶斜杠)。使用中對其他任何可用參數也均可使用本命令格式查看該參數的具體說明。
    • (2)Enum
      • 通過命令行工具Bcdedit,我們可以添加、刪除及修改BCD (Boot Configuration Data)中的對象。
      • 在BCD中,每個對象均具有唯一的GUID (Globally Unique Identifier : 全局唯一標識符),如系統中的每塊硬盤、每個分區的GUID (全局唯一標識符)均不相同。
      • 在BCD中,硬盤或分區的GUID可分為如下幾類:
        • {ntldr}: 指存在上代NT50系列操作系統(Windows XP/2000/2003)的硬盤或分區;
        • {default}: 默認所在硬盤或分區;
        • {current}: 當前硬盤或分區;
        • {}: 類似於這個格式的GUID指其他安裝瞭操作系統的硬盤或分區。
      • (註:相應的GUID可通過“bcdedit ”或“bcdedit /enum all ”命令查看。這樣會顯示BCD當前的啟動設置數據,包含瞭所有在BCD記錄中的操作系統,均能顯示其GUID,用戶可以此作更改啟動數據的參考。)
    • (3)保險措施(使用BCDEdit備份與恢復啟動選項)
      • 在對Windows NT60的啟動選項修改之前,最好先對其備份,以防萬一操作失誤或其他故障導致系統無法啟動。
        • bcdedit /export <目錄> : 將啟動設置備份到指定的目錄下;
        • bcdedit /import <目錄> : 恢復之前備份在指定目錄下啟動選項。
      • 註:當需要還原備份的啟動選項時,應仔細檢查備份的啟動選項是否對應於自己所需要的,否則重新設置會比較麻煩。

使用BCDEdit修改啟動菜單選項

  • 作為一種良好的操作習慣,在對Windows Vista的啟動選項進行任何修改前,首先要對BCD中的啟動選項進行備份,相應的命令上頁我們已介紹過,在此不再贅述;其次,使用“bcdedit ”或“bcdedit /enum all ”來查看系統中硬盤或分區的正確GUID 標識,並將其記錄下來。
  • 畢竟,BCDEdit只是一款命令行工具,我們操作時需手動輸入類似“”這樣的長字符串時,很容易出錯,而這往往會導致Windows Vista啟動失敗。
  • 下面詳細介紹使用BCDEdit修改啟動選項的常用命令格式:
    • bcdedit /set {ntldr} Description “Windows XP Professional SP2”: 修改上一代在啟動菜單中的顯示內容,比如說我們也可將其修改為“Vista天地de專用XP SP2”之類。註意,命令中的引號不可省略;操作系統
    • bcdedit /set {current} description “Windows Vista Build 5270 x86″: 修改當前啟動硬盤或分區上的操作系統在啟動菜單中的顯示內容。註意,當前分區上的操作系統可能為Windows Vista,也可以是其他系統,當然,命令中的引號也不可省略;
    • bcdedit /set {} description “Windows Vista Build 5270 x64”: 修改安裝於其他硬盤或分區的系統在啟動菜單中的顯示內容,使用這項命令時一定要註意該硬盤/分區的GUID輸入正確,相應的GUID可通過“bcdedit ”或“bcdedit /enum all ”命令查看。
    • bcdedit /default {current} :將當前啟動硬盤/分區中的操作系統設置為默認啟動的系統;
    • bcdedit /default {} :設置指定GUID上的操作系統為默認啟動的系統;
    • bcdedit /default {ntldr} :設置上一代Windows 系統Windows XP為默認啟動的系統;
    • bcdedit /displayorder : 設置啟用菜單中各項的顯示順序,如:
    • bcdedit.exe /displayorder {ntldr} {current} :將首先顯示Windows XP,然後再顯示默認啟動的系統如Windows Vista;
    • bcdedit /timeout 15 :將默認的啟動菜單顯示時間30秒更改為15秒,當然,您可以將這個時間修改為任何您希望的數值。
    • 使用BCDEdit修復硬盤/分區結構錯誤
      在對啟動選項的修改過程中,如添加或刪除某個硬盤/分區時,可能會因操作中的不慎導致硬盤/分區結構的混亂,除瞭采用恢復修改前的備份方法外,也可以首先使用BCDEdit來嘗試一下修復。具體方法如下:

X:\>X:\boot\fixntfs.exe -lh -all : 這時的“X: ”指引導目錄 “boot” 所在的硬盤/分區;
bcdedit /set device partition=X: : 將指定GUID的分區設為啟動分區。註意,這裡的“X: ”的GUID須與指定值不同,同時,搜狗電腦網,運行該命令後,必須接著運行下面的osdevice命令;
bcdedit /set osdevice partition=X: : 將指定GUID的分區設為啟動分區。註意,這個命令必須與上面的device命令配對使用,同時“X: ”的GUID須與指定值不同。


Bcdedit命令詳解,自定義Vista啟動管理項

Bcdedit 位於X:\Windows\system32\ “X:"為安裝Vista的盤符。

儲存操作指令
====================
/createstore 創建一個新的空白啟動配置數據文件。
bcdedit /createstore C:\Data\BCD 創建BCD啟動配置數據文件儲存到“C:\DATA\”文件夾。
/export 備份啟動配置數據文件。
bcdedit /export “C:\Data\BCD Backup" 備份BCD啟動配置文件到“C:\Data\”文件夾,並以“BCD Backup”命名。
/import 還原啟動配置數據文件。
bcdedit /import “C:\Data\BCD Backup" 從“C:\Data\”文件夾恢復BCD啟動配置文件。

儲存項目操作指令
====================
/copy 項目拷貝
操作系統啟動項目的拷貝:
bcdedit /copy /d “Copy of entry"
/create 新建項目
創建操作系統載入程序項目的NTLDR(Ntldr):
bcdedit /create /d “Earlier Windows OS Loader"
創建存儲器磁碟另外的選擇項項目:
bcdedit /create /d “Ramdisk options"
創建一個新的操作系統啟動項目:
bcdedit /create /d “Windows Vista" /application osloader
創建一個新的調試器:
bcdedit /create /d “Debugger Settings"
/delete 刪除項目
刪除指定的操作系統項目:
bcdedit /delete
刪除指定的操作系統項目但啟動時不顯示項目(徹底刪除):
bcdedit /delete /cleanup
刪除指定的操作系統項目但啟動時顯示項目:
bcdedit /delete /nocleanup
刪除操作系統載入程序項目的NTLDR:
bcdedit /delete /f

項目選擇操作指令
====================
/deletevalue 刪除項目選擇項。
刪除啟動管理的bootmgr選擇項項目:
bcdedit /deletevalue bootsequence
刪除(WinPE)操作系統的數值開機項目:
bcdedit /deletevalue winpe
刪除來自指定的操作的Windows PE 數值系統開機項目:
bcdedit /deletevalue winpe
/set 設定項目選擇項數值。
設定操作系統“cbd971bf-b7b8-4885-951a-fa03044f5d71”引導分區“C”:
bcdedit /set device partition=C:
指定的操作系統引導文件“windows\ system 32\ winload.exe”:
bcdedit /set path \windows\system32\winload.exe
設定“NX”為“OptIn”:
bcdedit /set nx optin
更改系統名稱
默認XP系統名稱在Vista啟動管理器中是"earlier version of Windows",更改:
bcdedit /set Description “Windows XP Professional SP2″
默認Vista系統名稱在Vista啟動管理器中是"Microsoft Windows",更改:
bcdedit /set Description “Windows Vista 5456″
輸出控制指令
====================
/enum 在儲存中的列表項目。
列出所有的操作系統載入程序啟動項目:
bcdedit /enum OSLOADER
列出所有的啟動管理項目:
bcdedit /enum BOOTMGR
列出默認的啟動項目:
bcdedit /enum
列出指定的操作系統啟動項目:
bcdedit /enum
/v 列出所有活動的項目
bcdedit /enum ACTIVE /v

啟動管理控制指令
====================
/bootsequence 設定啟動列表順序。
設定二個操作系統項目和啟動順序:
bcdedit /bootsequence {cbd971bf-b7b8-4885-951a- fa03044f5d71}
加入操作系統項目為啟動列表最後項:
bcdedit /bootsequence /addlast
/default 設定默認啟動項目。
設定默認啟動項目:
bcdedit /default
設定默認啟動操作系統程序為NTLDR:
bcdedit /default
/displayorder 設定哪一個系統啟動顯示多啟動畫面。
設定二個操作系統項目和在啟動管理顯示命令中被建立操作系統載入的程序NTLDR:
bcdedit /displayorder
把指定的操作系統項目加入啟動管理顯示命令結束:
bcdedit /displayorder /addlast
/timeout 設定啟動暫停數值。
/toolsdisplayorder 設定命令在哪一個啟動管理顯示工具畫面。
設定二個工具項目和內存診斷在那啟動管理工具顯示命令:
bcdedit /toolsdisplayorder
把指定的工具項目加入啟動的結束管理工具顯示命令:
bcdedit /toolsdisplayorder /addlast

為一個啟動應用程序控制緊急處理服務的指令
====================
/bootems
開啟啟動管理緊急處理服務:
bcdedit /bootems ON
/ems
為目前的操作系統啟動項目EMS 開啟:
bcdedit /ems ON
/emssettings 設定緊急處理服務參數。
設定EMS 參數使用基本輸出入系統設定:
bcdedit /emssettings BIOS

實際上,大家打開命令提示符,輸入 bcdedit /? 同樣可以獲得更詳盡的幫助:

BCDEdit 命令列選項

BCDEdit.exe 有下列可用的命令列選項。
BCDEdit / Command [Argument1] [Argument2] …

  • /createstore
    建立新的且空的開機設定資料存放區。建立的存放區並非系統存放區。
  • /export
    將系統存放區的內容匯出至檔案。這個檔案稍後可用於還原系統存放區的狀態。這個命令僅對系統存放區有效。
  • /import
    利用先前使用 /export 選項所產生的備份資料檔案,還原系統存放區的狀態。這個命令會在進行匯入之前,先刪除任何存在於系統存放區中的項目。這個命令僅對系統存放區有效。
  • /store
    這個選項可用於大部分的 BCDedit 命令,以指定要使用的存放區。如果未指定這個選項,則 BCDEdit 會在系統存放區上操作。自行執行 bcdedit /store 命令,相當於執行 bcdedit /enum active 命令。
  • /copy
    在相同的系統存放區中,製作指定之開機項目的複本。
  • /create
    在開機設定資料存放區中建立新項目。如果指定了通用的識別元,則無法指定 /application、/inherit 及 /device 選項。如果未指定識別元或不是通用的識別元,則必須指定 /application、/inherit 或 /device 選項。
  • /delete
    從指定的項目刪除元素。
  • /deletevalue
    從開機項目刪除指定的元素。
  • /set
    設定項目選項值。
  • /enum
    列出存放區中的項目。/enum 選項是 BCEdit 的預設值,因此執行 bcdedit 命令時,若未加上選項,則相當於執行 bcdedit /enum active 命令。
  • /v
    詳細資料模式。通常任何通用的項目識別元都會以好記的簡短形式呈現。指定 /v 作為命令列選項,會將所有的識別元全部顯示出來。自行執行 bcdedit /v 命令,相當於執行 bcdedit /enum active /v 命令。
  • /bootsequence
    指定一次性顯示順序,以用於下一次開機。這個命令類似於 /displayorder 選項,唯一的不同在於它僅用於下一次電腦啟動時。之後,電腦會還原為原本的顯示順序。
  • /default
    指定在逾時過期時,開機管理程式要選取的預設項目。
  • /displayorder
    指定向使用者顯示開機選項時,開機管理程式要使用的顯示順序。
  • /timeout
    指定在開機管理程式選取預設項目之前,要等候的時間 (以秒為單位)。
  • /toolsdisplayorder
    指定顯示 [工具] 功能表時,開機管理程式要使用的顯示順序。
  • /bootems
    啟用或停用指定項目的緊急管理服務 (EMS)。
  • /ems
    啟用或停用指定之作業系統開機項目的 EMS。
  • /emssettings
    設定電腦的全域 EMS 設定。/emssettings 不會啟用或停用任何特定開機項目的 EMS。
  • /bootdebug
    啟用或停用指定之開機項目的開機偵錯工具。雖然這個命令可用於任何的開機項目,但它僅對開機應用程式有效。
  • /dbgsettings
    指定或顯示系統的全域偵錯工具設定。這個命令不會啟用或停用核心偵錯工具,請針對該用途使用 /debug 選項。若要設定個別的全域偵錯工具設定,請使用 bcdedit /setdbgsettings type value 命令。
  • /debug
    啟用或停用指定之開機項目的核心偵錯工具。

轉錄-Creating BCD from scratch with BCDedit.exe and add “Repair my computer" WinRE Recovery Environment

(出處)
My Boot Configuration Data (BCD Store) for my Windows 7 got hosed and I had to delete it and boot off a Windows DVD, hit Shift + F10 to get at a command prompt, delete my old BCD and run Bootrec.exe /rebuildBCD to even be able to boot my system. But RebuildBCD left the file with the bare minimum necessary to boot, nearly blank, and I lost the option to run “Repair My Computer" from the F8 screen. I found a useful website: http://forum.acronis.com/forum/6758 that helped me get back on the right track, but I had to dabble around myself to get all the settings that Windows 7 Installation would normally handle. Follow these instructions to restore your BCD file so that you can run “Repair" off the hard drive instead of digging around for a DVD. “bcdedit /enum all" lists your BCD config and “bcdedit /enum all /v" lists all GUIDs instead of friendlynames. the GUID’s I have listed ARE different (make sure you check the 8th digit). Before you begin you might want to do “bcdedit /export C:\before.BCD".

1. Create necessary optional entries
bcdedit /create {globalsettings}
bcdedit /create {bootloadersettings}
bcdedit /create {resumeloadersettings}
bcdedit /create {emssettings}
bcdedit /create {dbgsettings}
bcdedit /create {hypervisorsettings}
bcdedit /create {badmemory}
bcdedit /create {memdiag}

2. Establish proper settings for these optional entries
bcdedit /set {bootmgr} INHERIT {globalsettings}
bcdedit /set {current} INHERIT {bootloadersettings}
bcdedit /set {globalsettings} INHERIT {dbgsettings} {emssettings} {badmemory}
bcdedit /set {bootloadersettings} INHERIT {globalsettings} {hypervisorsettings}
bcdedit /set {resumeloadersettings} INHERIT {globalsettings}
bcdedit /set {emssettings} bootems YES
bcdedit /dbgsettings SERIAL DEBUGPORT:1 BAUDRATE:115200
bcdedit /hypervisorsettings SERIAL DEBUGPORT:1 BAUDRATE:115200
bcdedit /toolsdisplayorder {memdiag}

bcdedit /set {memdiag} description “Windows Memory Diagnostic"
bcdedit /set {memdiag} device partition=\Device\HarddiskVolume1
bcdedit /set {memdiag} path \boot\memtest.exe
bcdedit /set {memdiag} locale en-US
bcdedit /set {memdiag} inherit {globalsettings}
bcdedit /set {memdiag} badmemoryaccess Yes

3. Link “Windows Boot Manager" and primary “Windows Boot Loader" to your existing “Resume from Hibernate" identifier (replace the GUID)
bcdedit /set {bootmgr} resumeobject {8de128fe-03a5-11e1-a7d3-a215a48a5459}
bcdedit /set {current} resumeobject {8de128fe-03a5-11e1-a7d3-a215a48a5459}

4. Create loader entry for the “Recovery"(Repair My Computer)
Check C:\Recovery\ (gain access by adding “Users" READ permission)
Copy & Use that GUID here for device and osdevice – in my case 8de128ff-………… omitting the curly braces { } after [C:]\Recovery
On Line 2 and Line 3, for device and OSdevice, the final GUID after \Winre.wim doesnt exist yet (if you look carefully the 8th digit is changed – and will now have to be created ….
after \Winre.wim, create a NEW UNUSED GUID (change the 8th digit) – it will be used in step 6.

bcdedit /create {8de128ff-03a5-11e1-a7d3-a215a48a5459} /application osloader
bcdedit /set {8de128ff-03a5-11e1-a7d3-a215a48a5459} device ramdisk=[C:]\Recovery\8de128ff-03a5-11e1-a7d3-a215a48a5459\Winre.wim,{8de128f5-03a5-11e1-a7d3-a215a48a5459}
bcdedit /set {8de128ff-03a5-11e1-a7d3-a215a48a5459} osdevice ramdisk=[C:]\Recovery\8de128ff-03a5-11e1-a7d3-a215a48a5459\Winre.wim,{8de128f5-03a5-11e1-a7d3-a215a48a5459}
bcdedit /set {8de128ff-03a5-11e1-a7d3-a215a48a5459} path \windows\system32\winload.exe
bcdedit /set {8de128ff-03a5-11e1-a7d3-a215a48a5459} description “Windows Recovery Environment WinRE"
bcdedit /set {8de128ff-03a5-11e1-a7d3-a215a48a5459} inherit {bootloadersettings}
bcdedit /set {8de128ff-03a5-11e1-a7d3-a215a48a5459} systemroot \windows
bcdedit /set {8de128ff-03a5-11e1-a7d3-a215a48a5459} nx OptIn
bcdedit /set {8de128ff-03a5-11e1-a7d3-a215a48a5459} winpe yes

5. Enable the {current} OS to allow the Recovery Sequence you just created
bcdedit /set {current} recoverysequence {8de128ff-03a5-11e1-a7d3-a215a48a5459}
bcdedit /set {current} recoveryenabled Yes

6. With that NEW UNUSED GUID you just created in step 4, create the “Ramdisk Options" entry for the Recovery Sequence
On Line 4, after \Recovery\ – use the GUID you found in C:\Recovery\ -again Omit the Curly braces { }
bcdedit /create {8de128f5-03a5-11e1-a7d3-a215a48a5459} /device
bcdedit /set {8de128f5-03a5-11e1-a7d3-a215a48a5459} description “Ramdisk Options"
bcdedit /set {8de128f5-03a5-11e1-a7d3-a215a48a5459} ramdisksdidevice partition=C:
bcdedit /set {8de128f5-03a5-11e1-a7d3-a215a48a5459} ramdisksdipath \Recovery\8de128ff-03a5-11e1-a7d3-a215a48a5459\boot.sdi

Now you are done, and might want to export again to not lose your work, “bcdedit /export C:\AFTER.BCD"

常見用途:

bcdedit /enum all 列出存放區中的所有項目
bcdedit /store S:\EFI\Microsoft\Boot\BCD /enum all 列出(S:\EFI\Microsoft\Boot\BCD)存放區中的所有項目

更多延伸閱讀

修改 BCD 存放區範本
Walkthrough: Boot Windows PE from a UEFI-based Hard Disk

什麼是GPT什麼是MBR,NTFS又是什麼東西?

$
0
0

網路上很多人討論與解釋GPT、MBR、NTFS,不過總是長篇大論,以下有個簡易的了解方法,讓大家簡顯易懂:GPT、MBR、NTFS基本上都是存於電腦硬碟中的格式。我們將硬碟比喻成是一間圖書館。GPT與MBR就好比圖書館中的書架。

  • GPT可在大型圖書館中放很多書架(硬碟可支援到18ET〈1887萬TB〉,可分割128磁區)。
  • MBR只適合小型圖書館中擺放的書架(硬碟支援到2TB,最多可分個4個主要磁區)。
  • NTFS就好比書架上的書,供圖書館人員編排書籍使用,所以NTFS同時可存於GPT與MBR兩種格式中。

搞清楚GPT跟MBR的差別

硬碟愈來愈大,傳統電腦中的BIOS卻只能定位到2TB左右的容量,超過的空間就無法使用,這是因為BIOS所採用的磁碟分割方式為「MBR」

MBR(Master Boot Record)
只能定址約2TB左右的大小(2.2 × 10¹²位元組),而且也只支援最大4個主分割區,也就是如果你有一顆3TB以上的硬碟,一定無法只分割為一個分割區而能用完全部容量。

因此各家主機板廠商紛紛推出新一代的UEFI BIOS,如此才能解決硬碟的辨識問題,所以UEFI的出現不是光為了讓BIOS圖形化更容易使用,更是為了要支援「GPT」這個硬碟分割格式,它才能支援3TB以上的大容量硬碟喔!

GPT(GUID Partition Table)
從特性上看來,確實比MBR優秀不少,光是可以支援最大容量到18EB(約為1887萬TB),以及分割區最大可以到128個,就足夠打到MBR站不起來了。

從Windows Server 2003以後的微軟系統,都可以讀寫GPT分割區,蘋果電腦從OS X開始也都開始支援,不過除了少數Linux系統以外,幾乎都只支援從UEFI來啟動GPT,並不能從BIOS中開機,因此以微軟Windows來說,目前就分為BIOS+MBR以及UEFI+GPT兩種開機方式,撇除開機時的不同,在進入系統以後的操作方式及功能,都是完全相同的,最大不同只差在支援的硬碟大小跟數量。

我只知道我的硬碟是NTFS,這跟MBR或GPT有關係嗎?

又是MBR、GPT又是NTFS的,確實很讓人摸不著頭緒。如果把硬碟空間當作一座圖書館的話,分割區MBR及GPT是一個個書架,讓你可以放置書籍,不用把書全部堆在地上亂糟糟。而NTFS/FAT32等就是書架上的書的排列方式,所以我們可以稱MBR及GPT為「分割區」,而NTFS/FAT32等檔案格式就是「分割表」。

那這麼說來,不管硬碟多大,一律分割成GPT磁區不就好了,既是未來的趨勢,新的格式用起來爽度也夠,不過GPT也不是完全只有優點,雖然說在系統碟格式化成GPT並安裝Windows 7/8用起來根本不會有問題,不過如果你還要把這顆硬碟安裝到其他舊系統(如XP)的電腦,就很有可能會讀不到囉!

GPT會多分割出了好幾塊空間

還有GPT硬碟因為相容性的關係,明明你只是要分割一個主分割區,卻一次就多分出了好幾塊空間,看起來相當礙眼,為什麼會這樣呢?

GPT分割區因為是新格式,不免會與舊系統或硬體共用,但是舊版系統跟硬碟分區軟體有可能會不認得GPT啊!因此GPT分區在建立時也會順便建立一個性質為「Protective MBR」的分割區,以免無法辨識GPT分割區的軟體誤將檔案內容破壞。因此通常在使用Windows 8光碟安裝UEFI系統時,除了產生安裝系統的主分割區以外,還會有以下3個分割區:(這裡有分隔的圖)

  • 修復分割區(約300MB):這個分割區是微軟獨有,用來在需要修復系統的情況,供給Windows RE(Windows Recovery Environment)存取之用。
  • ESP分割區(約100MB):非必須存在,放置UEFI啟動檔案,在開機時UEFI BIOS會讀取這塊區域,檔案格式為FAT32。
  • MSR分割區(約128MB):必須存在,就是前面所說的Protective MBR,當這顆碟安裝到不支援GPT的系統或硬碟管理軟體時,由於它們只會讀取到此分割區,就不會破壞GPT主分割區中的檔案了。

由於以GPT方式分割硬碟實在是分太多區塊了,因此有的網友認為2TB以內的硬碟在安裝系統時只要用傳統的BIOS+MBR安裝即可。

而且用SSD來安裝系統已經漸漸成為趨勢,目前SSD的主流大小在128~256GB左右,更是不能任意浪費空間,即使GPT分割區實在是好處多多,但MBR也還尚未過氣,一般電腦使用仍綽綽有餘。

Windows重覆開機reboot測試範例 – batch file

$
0
0

常常需要自動重新開機的測試, windows7 設定開機自動啟動某應用程式, 先建立將要啟動的程式捷徑。

如下面的run.bat , 將此捷徑複製到以下目錄位置。
C:\Users\使用者帳號\AppData\Roaming\Microsoft\Windows\Start Menu\Programs\Startup
以後開機就會自動啟動這個程式了。

重覆開機測試範例 run.bat :

@echo off  不輸出指令
start /wait C:\test1.bat 開新視窗去執行令一個batch檔, 且會等待他執行完

ping 127.0.0.1 > nul 另類等待數秒的做法

set rootpath=C:\Users\xxxxx\Desktop\test  設定環境變數
set day=20120111
set logfile=%rootpath%\%day%\log.txt

findstr /C:"A123456789" E:\result.xml 在檔案裡面搜尋關鍵字
if %errorlevel%==1 goto Fail  若為1表示沒找到
if %errorlevel%==0 goto pass  若為0表示有找到

echo %time%: Fail >> %logfile% 若走到此表示其他錯誤
cls  清螢幕
color 8c 改字體顏色
pause 暫停

:pass
echo %time%: PASS >> %logfile%  輸出文字到log檔案
goto end

:Fail
cls
echo %time%: NOT Found >> %logfile%
echo.
echo-----------------------------------
echo		NOT Found
echo-----------------------------------
echo.
color 8c
pause

:end
shutdown /r /t 1 在一秒後自動重開機

製作WinPE開機碟USB Drive, 包含簡易版與進階版修改WinPE內容

$
0
0

入門製作: WINPE開機的USB隨身碟

建立 Windows PE (WinPE) 可開機 USB 快閃磁碟機或外接式 USB 硬碟。MSDN原廠的說明: https://msdn.microsoft.com/zh-tw/library/hh825109.aspx

1. 先安裝 Windows ADK
透過從 Windows 評定及部署套件 (Windows ADK) 安裝下列功能:
– 部署工具:包含 [部署與映像工具環境]。
– Windows 預先安裝環境 :包含用來安裝 Windows PE 的檔案

2. 開始安裝 Windows PE
以 [系統管理員] 身分開啟 [部署與映像工具環境]。

建立 Windows PE 檔案的工作複本。可指定 x86、amd64 或 arm:

  • //64位元版本:可將64位元UEFI、64位元BIOS電腦開機
    • copype amd64 C:\WinPE_amd64
  • //32位元版本:可將 32 位元 UEFI、32位元和64位元BIOS電腦開機
    • copype x86 C:\WinPE_x86

將 Windows PE 安裝到 USB 快閃磁碟機,指定磁碟機代號:(根據USB碟的字母代號調整)
MakeWinPEMedia /UFD C:\WinPE_amd64 E:

3. 將此WINPE隨身碟插入另一電腦, 開機到 Windows PE
將 USB 裝置連接到您要使用的電腦。
啟動電腦,然後按下開啟韌體開機功能表的按鍵。選取 USB 磁碟機。Windows PE 會自動啟動。
出現命令視窗後,會執行 wpeinit 命令,此命令會設定系統。這可能需要數分鐘。

4. 常見的疑難排解
如果沒有出現 Windows PE,請嘗試下列解決方法,並在每次嘗試之後重新啟動電腦:

  • 如果不能辨識 copype 命令,請確定您是從 [部署與映像工具環境] (它是 Windows ADK 的一部分) 執行命令。
  • 若要啟動支援 UEFI 模式的電腦,在韌體開機功能表中,試著手動選取開機檔案:\EFI\BOOT\BOOTX64.EFI。
  • 嘗試不同的 USB 連結埠。避免使用集線器或纜線。
  • 如果韌體不包含對 USB 3.0 的原生支援,請避免使用 USB 3.0 連接埠。
  • 清理 USB 快閃磁碟機,然後重新安裝 Windows PE。這有助於移除額外的開機磁碟分割或其他開機軟體。
    透過以下指令清理 USB 快閃磁碟機,然後重新安裝 Windows PE。
    diskpart
      list disk
      select disk 
      clean
      create partition primary
      format quick fs=fat32 label="Windows PE"
      assign letter="F"
      exit
    
    MakeWinPEMedia /UFD C:\winpe_amd64 F:
    
  • 嘗試改從 DVD 啟動 Windows PE。建立可以燒錄至 DVD 的 ISO 檔案:

    透過以下指令產生WINPE 的 ISO 檔案
    MakeWinPEMedia /ISO C:\winpe_amd64 c:\winpe_amd64\winpe.iso

    在檔案總管中,瀏覽至 C:\winpe_amd64,在 winpe.iso 上按一下滑鼠右鍵,然後選取 [燒錄至光碟]。
    遵循提示建立 DVD。

進階製作:手動調整的WinPE內容

以上如果都完成了, 就可以接著試試進階內容, 參考自MSDN說明:(WinPE 掛接和自訂)

[1. 掛接 Windows PE 開機映像]

Dism /Mount-Image /ImageFile:"C:\WinPE_amd64\media\sources\boot.wim" /index:1 /MountDir:"C:\WinPE_amd64\mount"

執行後就會把boot.wim的內容掛載(mount)到C:\WinPE_amd64\mount
如下:

[2. 新增修改自訂內容]

  1. 新增裝置驅動程式 (.inf 檔案) 。
    • 您可以自訂裝置驅動程式,像是支援網路介面卡或存放裝置的驅動程式。如需詳細資訊,請參閱 WinPE:新增驅動程式。
    • 1) 將裝置驅動程式新增至 Windows PE 映像。
      Dism /Add-Driver /Image:"C:\WinPE_amd64\mount" /Driver:"C:\SampleDriver\driver.inf"
      2) 確認驅動程式套件是映像的一部分:
      Dism /Get-Drivers /Image:"C:\WinPE_amd64\mount"
      檢查產生的驅動程式清單,確認清單包含您新增的驅動程式套件。

  2. 新增選用元件 (套件或 .cab 檔案) 。
    • 您可以新增功能到 Windows PE,例如,語言、Hotfix、以及對 PowerShell 和 HTML 應用程式語言 (HTA) 等功能的支援。在 Windows PE 中,功能套件又稱為選用元件。如需詳細資訊,請參閱 WinPE:新增套件 (選用元件參考)
    • #語言#:安裝每個選用元件時,您必須先安裝非語言相關選用元件,然後再安裝特定語言選用元件。必要語言資源的版本必須與非語言相關資源的版本相同。語言資源位於資料夾中,該資料夾與安裝在選用元件目錄中的語言名稱相同。

      #重要#:有些選用元件具有必須按順序安裝的先決條件。

      1) 將選用元件新增到 Windows PE。
      如果要新增選用元件,您需要同時新增選用元件及其相關的語言套件。(路徑需根據自己電腦作調整)
      Dism /Add-Package /Image:"C:\WinPE_amd64\mount" /PackagePath:"C:\Program Files\Windows Kits\8.1\Assessment and Deployment Kit\Windows Preinstallation Environment\amd64\WinPE_OCs\WinPE-HTA.cab"

      Dism /Add-Package /Image:"C:\WinPE_amd64\mount" /PackagePath:"C:\Program Files\Windows Kits\8.1\Assessment and Deployment Kit\Windows Preinstallation Environment\amd64\WinPE_OCs\en-us\WinPE-HTA_en-us.cab"

      2) 確認選用元件是映像的一部分:
      Dism /Get-Packages /Image:"C:\WinPE_amd64\mount"
      檢查產生的套件清單,確認清單包含選用元件及其關聯的語言套件。

  3. 新增語言 。
  4. 新增啟動指令碼 。
    • 範例包含設定網路連線,或者新增自訂應用程式,例如診斷軟體。
    • 修改 Startnet.cmd 指令碼以包含您的自訂命令。此檔案位於 C:\WinPE_amd64\mount\Windows\System32\Startnet.cmd。
      您也可以從此檔案呼叫其他批次檔或命令列指令碼。
      針對隨插即用或網路功能支援,請確定您在自訂 Startnet.cmd 指令碼中包含對 wpeinit 的呼叫
    • ### 補充引用文章: iInfo 資訊交流 – Winpe啟動過程 ###

      Windows PE 的啟動過程如下。
      1) 載入特定媒體上的開機磁區。將控制傳遞給 Bootmgr。
      – Bootmgr 從啟動配置資料 (BCD) 中提取基本的啟動資訊,並將控制權傳遞給 Boot.wim 中包含的 Winload.exe 文件。
      – 然後 Winload.exe 載入相應的硬體抽象層 (HAL),並載入系統登錄配置單元和必需的啟動驅動程式。
      – 完成載入後,將會準備執行內核 Ntoskrnl.exe 的環境。
      – 備註: 如果從唯讀媒體(例如 CD)啟動 Windows PE,則 Windows PE 將在記憶體中存儲註冊表配置單元,這樣應用程式就可以寫入註冊表。應用程式對註冊表所做的任何更改在不同的 Windows PE 會話間不會保持不變。

      2) 執行 Ntoskrnl.exe,完成環境設置。將控制權傳遞給會話管理器 (SMSS)。

      3) SMSS 載入註冊表的剩餘部分,配置運行 Win32 子系統 (Win32k.sys) 的環境及其各種進程。SMSS 載入用於創建使用者會話的 Winlogon 進程,然後啟動服務和剩餘的非必要設備驅動程式及安全子系統 (LSASS)。


      4) Winlogon.exe 根據註冊表值 HKLM\SYSTEM\Setup\CmdLine 來運行設置。
      – 如果存在 %SYSTEMDRIVE%\sources\setup.exe,則 Winpeshl.exe 將啟動它,否則 Winpeshl.exe 將查找在 %SYSTEMROOT%\system32\winpeshl.ini 中指定的應用程式。
      – 如果未指定任何應用程式,則 Winpeshl.exe 將執行 cmd /k %SYSTEMROOT%\system32\startnet.cmd。預設情況下,Windows PE 包含一個將啟動 Wpeinit.exe 的 Startnet.cmd 文件。Wpeinit.exe 載入網路資源,並與網路元件(如 DHCP)進行協調。

      5) Wpeinit.exe 完成後,將顯示命令提示視窗。此時,Windows PE 的啟動過程已完成。
      Winpeshl.ini 可控制是將自訂外殼程式載入到 Windows(R) PE,還是載入到默認的“命令提示符”視窗。若要載入自訂外殼程式,請創建一個名為 Winpeshl.ini 的文件,然後將它放在自訂 Windows PE 映射的 %SYSTEMROOT%\System32 中。

      #MSDN說明:Winpeshl.ini 參考#
      使用 Windows 預先安裝環境 (Windows PE) 中的 Winpeshl.ini 檔案,以殼層應用程式或其他應用程式取代預設命令提示字元。

      #該 Winpeshl.ini 檔必須包含以下部分:#

      [LaunchApp]
      AppPath = %SYSTEMDRIVE%\myshell.exe
      [LaunchApps]
      %SYSTEMDRIVE%\mydir\application1.exe, {option}

      – 將 AppPath 項設置為外殼應用程式的路徑。可以使用完全限定路徑,也可以使用環境變數(例如%SYSTEMROOT%\System32\Myshell.exe)。AppPath 項不支援命令列選項。
      – 使用 [LaunchApps] 部分運行帶命令列選項的應用程式。應用程式按照列出的順序運行。應用程式的名稱與其選項之間以逗號分隔。

      #重要事項#
      – 當退出“命令提示符”視窗或自訂外殼應用程式時,Windows PE 將重新開機。
      – 不要編輯 Setupreg.hiv 的 HKEY_LOCAL_MACHINE\SYSTEM\Setup 註冊表項中的 CmdLine 值來啟動外殼應用程式。CmdLine 的值可調用 Winpeshl.exe,Winpeshl.exe 會執行很多函數,包括調用 Windows PE 中的預設“命令提示符”視窗或您的自訂外殼應用程式。

  5. 新增應用程式 。
    • 請注意,Windows PE 只支援舊版應用程式。

      1) 在掛接的 Windows PE 映像內建立應用程式目錄。
      md “C:\WinPE_amd64\mount\windows\"
      2) 將必要的應用程式檔案複製到本機 Windows PE 目錄。
      Xcopy C:\ “C:\WinPE_amd64\mount\windows\"
      3) 啟動 Windows PE 並從 X: 目錄執行應用程式,之後測試應用程式。
      X:\Windows\System32> X:\Windows\

      如果應用程式需要暫時存放區,或 Windows PE 在執行應用程式時變得沒有回應,您可能需要增加配置給 Windows PE 的暫時存放區 (臨時空間) 的數量。

  6. 新增暫時存放區 (臨時空間) 。
    • 如果您的應用程式需要暫存檔存放區,可以在 RAM 中保留額外的記憶體空間。
    • 1) Windows PE 會在 X: 磁碟機上保留記憶體,用來解壓縮 Windows PE 檔案,加上額外的暫存檔存放區 (稱為臨時空間),可供您的應用程式使用。

      根據預設,超過 1 GB RAM 的電腦的臨時空間為 512 MB,其他則為 32 MB。有效值為 32、64、128、256 或 512:
      Dism /Set-ScratchSpace:128 /Image:"C:\WinPE_amd64\mount"

  7. 取代背景影像
    • 如果您有多個版本的 Windows PE,可以設定背景影像,以便立即辨別正在執行的 Windows PE 版本。

      變更 Windows PE 背景影像檔 (\windows\system32\winpe.jpg) 的安全性權限。這可讓您修改或刪除檔案。
      1) 在 Windows 檔案總管中,瀏覽到 C:\WinPE_amd64\mount\windows\system32。
      2) 在 C:\WinPE_amd64\mount\windows\system32\winpe.jpg 檔案按一下滑鼠右鍵,依序選取 [內容] > [安全性] 索引標籤 > [進階]。

      3) 在 [擁有者] 旁邊選取 [變更]。將擁有者變更為 [系統管理員]。
      套用變更,然後結束 [內容] 視窗以儲存變更。

      4) 在 C:\WinPE_amd64\mount\windows\system32\winpe.jpg 檔案按一下滑鼠右鍵,依序選取 [內容] > [安全性] 索引標籤 > [進階]。

      5) 修改 [系統管理員] 的權限,允許完整存取權。套用變更,然後結束 [內容] 視窗以儲存變更。

      使用您自己的影像檔取代 winpe.jpg 檔案。

  8. 新增回應檔案設定
    • 有些 Windows PE 設定可以使用回應檔案加以管理,如防火牆、網路及顯示設定。
      – 建立回應檔案,將它命名為 unattend.xml,然後新增到 Windows PE 媒體的根目錄,以便處理這些設定。
      – 第一次執行 Windows PE (WinPE) 時,使用 Wpeinit 和 Startnet.cmd 執行啟動指令碼。Wpeinit 會將記錄檔訊息輸出至 c:\Windows\system32\wpeinit.log。

      Wpeinit 命令列選項範例:
      Wpeinit –unattend:"C:\Unattend-PE.xml"

      如需詳細資訊,請參閱 Wpeinit 和 Startnet.cmd:使用 WinPE 啟動指令碼

[3. 卸載 Windows PE 映像和建立媒體]

3.1 卸載 Windows PE 映像。
Dism /Unmount-Image /MountDir:"C:\WinPE_amd64\mount" /commit

3.2 建立可開機媒體,例如 USB 快閃磁碟機。
MakeWinPEMedia /UFD C:\WinPE_amd64 F:

3.3 啟動媒體。
Windows PE 會自動啟動。Windows PE 視窗出現之後,會自動執行 wpeinit 命令。這可能需要數分鐘。驗證您的自訂。

列在後面:
Windows PE 如何運作


微軟的Windows作業系統是怎麼裝驅動程式的呢? (How Windows Installs Devices)

$
0
0

(原文出處: 這裡)

  1. The New Device is Identified (第一步:識別設備,獲取設備標識(ID))
  2. A Driver for the Device is Selected (第二步:選擇最優驅動安裝包)
  3. The Driver for the Device is Installed (第三部:安裝驅動)

Step 1: The New Device is Identified

當一個設備插入到計算機總線後,總線驅動檢測到設備插入,然後給設備分配一串硬件ID(hardware identifier (ID))。
例如,插入一個USB Key插入到電腦後,分配的硬件ID為:

USB\VID_096E&PID_0807&REV_0100
USB\VID_096E&PID_0807

Windows就靠此ID來尋找最優的那個驅動安裝包。

硬件ID的格式如下:

  • A bus-specific prefix, such as PCI\ or USB\.
  • Vendor-specific identifiers for the device, such as a vendor, model, and revision identifier. The format of these identifiers within the hardware ID is also specific to the bus driver.

Hardware ID
A hardware ID is a vendor-defined identification string that Windows uses to match a device to an INF file. In most cases, a device has associated with it a list of hardware IDs. (However, there are exceptions ? see Identifiers for 1394 Devices ). When an enumerator reports a list of hardware IDs for a device, the hardware IDs should be listed in order of decreasing suitability.
通過MSND中的解釋可以了解到:硬件ID是一組ID值,如上面例子中的兩列字符串。

Device ID
A device ID is a string reported by a device’s enumerator. A device has only one device ID. A device ID has the same format as a hardware ID.
設備ID不是一組ID值,只有一個唯一ID值,他唯一標識了此類設備,設備ID和硬件ID的格式一樣,硬件ID中最能嚴格定義此類設備的ID值就為設備ID。如上面兩條ID值中,第一條能更加準確的定義此類設備,所以第一條也叫設備ID。

Compatible ID
A compatible ID is a vendor-defined identification string that Windows uses to match a device to an INF file. A device can have associated with it a list of compatible IDs. The compatible IDs should be listed in order of decreasing suitability. If Windows cannot locate an INF file that matches one of a device’s hardware IDs, it uses compatible IDs to locate an INF file. Compatible IDs have the same format as hardware IDs. However, compatible IDs are typically more generic than hardware IDs.

關於設備ID,硬件ID,兼容ID等概念,可以參考MSDN:http://msdn.microsoft.com/EN-US/library/windows/hardware/ff541224(v=vs.85).aspx,或者《竹林蹊徑:深入淺出Windows驅動開發》中的第十二章。這裡不需要深入了解。

在設備管理器中,可以瀏覽硬件ID:

可以看到,硬件ID不只一個,它是一組ID,其中,最嚴格定義了該類設備的ID也被稱作設備ID。如上圖中,第一個條USB\VID_096E&PID_0807&REV_100為設備ID。

Step 2: A Driver for the Device is Selected

第一步得到硬件IDs,Windows開始搜索驅動安裝包。這節解決幾個問題:

搜索的對比規則是什麼?
搜索順序是怎樣的?
搜索結果有多個驅動匹配,如何選擇最優?
搜索對比規則

每個驅動安裝包中,都有一個INF文件,此文件記錄了廠商定義的設備信息等內容。以某個廠商的智能卡私有驅動為例,其INF片段如下:

[Manufacturer]
%MFGNAME1%=DeviceListMfg1,NTamd64

[DeviceListMfg1.NTamd64]
%USB\VID_08E6&PID_3437.DeviceDesc% =DriverInstall64, USB\VID_08E6&PID_3437 ;
%USB\VID_08E6&PID_3438.DeviceDesc% =DriverInstall64, USB\VID_08E6&PID_3438 ;
%USB\VID_08E6&PID_3480.DeviceDesc% =DriverInstall64, USB\VID_08E6&PID_3480 ;
%USB\VID_08E6&PID_34EC.DeviceDesc% =DriverInstall64, USB\VID_08E6&PID_34EC ;

可以看到[DeviceListMfg1.NTamd64]中,定義了每個產品的VID,PID信息,諸如:USB\VID_08E6&PID_3437,就是廠商自己定義的硬件ID,Windows搜索INF這個區域,對比第一步得到的硬件IDs和INF中的硬件ID,如果能精確匹配,那說明此驅動包符合安裝條件。

我們接著分析微軟的通用智能卡驅動是如何實現的,我們知道,微軟不可能知道我們的設備的硬件ID信息,也就說,在INF中,不能將全世界廠商的硬件ID全部記錄在INF文件中。所以,微軟引入了兼容ID(compatible ID)。兼容ID和硬件ID的格式一樣,但它更加通用,能囊括一大類設備。它被廠商定義在INF文件中。如果Windows沒有找到對應的硬件ID,它會去比對INF中的兼容ID,找到對應的驅動安裝包。

以微軟XP的CCID驅動為例,usbccid.inf中的片段:

[Manufacturer]
%CCID%=CCID,NTamd64

[CCID.NTamd64]
%USBCCID.DeviceDesc% = USBCCID.Install,USB\Class_0B&SubClass_00

此處的USB\Class_0B&SubClass_00,就是兼容ID,在設備管理器中也能顯示兼容ID:

驅動包的搜索順序

Windows搜索INF文件的位置,是按照一定規則來執行的,不同的操作系統,搜索順序會有所不同:

Search phase

Windows Server 2003, Windows XP, and Windows 2000

Windows Vista and
Windows Server 2008

Windows 7 and later versions of Windows

Without user interaction

DevicePath

Driver store

Windows Update

Driver store

DevicePath

With user interaction

Prompt for distribution media

Windows Update

DevicePath

Windows Update

Prompt for distribution media

Not applicable

DevicePath對應的路徑存儲在註冊裡:
HKEY_LOCAL_MACHINE\Software\Microsoft\Windows\CurrentVersion下,定義了DevicePath字符串鍵值。通常,對應的目錄為 Windows\inf。

Driver store在Vista以後,對應的路徑為:Windows\System32\DriverStore\FileRepository。 Vista以前的系統,路徑為:Windows\Driver Cache。從Vista以後的系統,系統開始重用Driver Store,如果找到一個匹配的驅動包,第一步就是先把這個安裝包拷貝到Driver Store中,然後安裝過程在Driver Store中進行。

下面舉例說明:

當前系統如果為Vista,當一個用戶插入一個智能卡到USB hub中時:

USB 總線驅動為智能卡創建一串硬件IDs,Windows首先會搜索Driver store(Windows\System32\DriverStore\FileRepository)中的INF文件。
如果未找到合適的驅動包,Windows啟動 添加新硬件嚮導,在嚮導裡,用戶可以選擇從Windows Update搜索(聯機搜索),也可以自己指定INF安裝路徑。

選擇聯機搜索,Windows搜索順序如下:

DevicePath(Windows\inf)
Windows Update
如果搜索不到,提示用戶插入光盤、軟盤,或者指定驅動包位置

如果驅動包找到,Windows將驅動包運輸(Staging)到Driver Store(Windows\System32\DriverStore\FileRepository)中。
當前系統如果為Win7,當一個用戶插入一個智能卡到USB hub中時:

USB 總線驅動為智能卡創建一串硬件ID,Windows首先會搜索Windows Update,如果找到,將驅動運輸到Driver store(Windows\System32\DriverStore\FileRepository)中。
如果未找到合適的驅動包,Windows繼續搜索Driver store(Windows\System32\DriverStore\FileRepository)和DevicePath(Windows\Inf).
如果找到了安裝,如果未找到,安裝失敗。
Win7不會自動運行安裝嚮導來讓用戶選擇驅動包,但這個嚮導仍然存在,在設備管理器中,選擇未識別的設備,右鍵,選擇更新驅動,同樣能夠達到安裝的目的。

選擇最優驅動包

搜索完成後,可能會有多個驅動包匹配成功,如不同版本號的驅動都匹配成功了。如何進一步篩選,選出最優驅動包?

如果Windows只找到一個驅動包,那好說,直接安裝。
如果Windows找到不只一個驅動包,Windows為每個驅動包的匹配度進行打分,打分最低的那個,就是最優的那個。
如何給驅動打分,有一套規則,規則比較複雜,打分在vista之前和vista之後會有所不同,有所不同,可以參考MSDN:http://msdn.microsoft.com/EN-US/library/ff686700(v=VS.85,d=hv.2).aspx

這里大致說明一下,影響分值有幾個因素:

驅動是如何被簽名(微軟簽名?第三方簽名?未簽名?等)
驅動ID是如何匹配的(根據硬件ID?根據兼容ID?等)
… …
如果打分最低的有多個(就是倒數並列第一的概念),Windows使用如下規則,進一步篩選:
是否已被簽名
通過INF的Version節中的DriverVer字段值判斷哪兒個版本最新,就選哪個。
下面摘自《竹林蹊徑:深入淺出Windows驅動開發》一個解釋片段:

Step 3: The Driver for the Device is Installed

選擇好了驅動,就開始安裝驅動了,安裝驅動的步驟如下:

通過INF文件中的CopyFiles指令,拷貝二進製文件(驅動和其他文件)到指定目錄
如果INF 中有DDInstall.Coinstallers段,註冊device-specific co-installer。 co-installer是一個DLL庫,是為了輔助設備驅動安裝的一個庫,它主要做一些在INF文件中無法描述的操作。例如,添加一些額外的信息到註冊表,讀取註冊表的一些關鍵信息用以執行不同的操作,安裝完成顯示完成頁面等。關於Co-installer更多的信息,可以參考MSDN:http://msdn.microsoft.com/EN-US/library/windows/hardware/ff554011(v=vs.85).aspx
讀取INF中的Class 和 ClassGuid字段,將設備進行歸類(軟件方式歸類,如將一個插入的鼠標歸類為Mouse,將所有的智能卡設備歸類為SmartCard)。如果此Class是一個系統中不存在的設備類型,廠商需要提供 類安裝庫(class installer),來安裝設備類。這也是一個DLL,而且類安裝過程中,也可以有class co-installers輔助安裝庫,具體信息參考MSDN:http://msdn.microsoft.com/EN-US/library/windows/hardware/ff554009(v =vs.85).aspx
當所有的驅動和co-installders都被註冊,Windows將控制權交給Plug and Play (PnP) manager,它負責加載和驅動設備。
PNP管理器首選調用驅動入口函數:DriverEntry,接著調用AddDevice,……,發送IRP_MN_START_DEVICE給驅動設備對象。驅動開始工作。

Windows利用批次檔(Batch)讀取指令執行的結果或文字檔案內容 for /f %i in …

$
0
0

透過指令去了解「/f」到底有什麼魅力呢?

首先,括弧裡面可用三種模式:

for /f %i in (Test.txt) do echo %i ,
(檔案)
(“字串")
(‘指令’)

因為預設是以空白(Space)或跳位(Tab)做切割,所以不是整行讀取。
for /f %i in (“This is a test.") do echo %i

也會遇到一樣的問題。
for /f %i in (‘dir /b’) do echo %i

這樣就可以知道「/f」的魅力了吧?

以下用文字文件test.txt來解釋

在前面參數可以自訂以取得想要的結果,以下文字文件來解釋:

第一個「delims」:
for /f “delims=]" %i in (Test.txt) do echo %i
就是指定字元去分割字串,當然「]」不存在,所以整句會直接上去,預設是空白(Space)或跳位(Tab)。而下面這樣會比較好懂:

for /f “delims=a" %i in (Test.txt) do echo %i

二個字也行喔:
for /f “delims=ai" %i in (Test.txt) do echo %i


接下來是「skip」:

for /f “skip=1″ %i in (Test.txt) do echo %i

就是第一行不要處理啦!

下一個是「eol」:
for /f “eol=$" %i in (Test.txt) do echo %i
就是前面有符號「$」不要處理啦!

下一個「tokens」比較複雜:
for /f “tokens=1,2,3″ %i in (Test.txt) do echo %i %j %k
他是說,把字串以空白切出來,所以「This is a test.」會被切成「This」「is」「a」「test.」,而取其中第 1, 2, 3 段分別丟到 %i, %j, %k 中。這是「tokens」特殊用法,被切出來的會依序從原指令 in 前面的 %i 開始丟。

下面這樣也可以:
for /f “tokens=1,2,3″ %i in (Test.txt) do echo %i %j %k
用連字號也沒有問題。

最後一個是沒有用過的「usebackq」:
for /f “usebackq" %i in (“Test.txt") do echo %i
是指原本用來表示「(檔案)」改成「(“檔案")」、「(“字串")」改成「(‘字串’)」、「(‘指令’)」改成「(`指令`)」。應該是為了要避免跳脫字元的關係,但個人沒有過的原因那就直接用跳脫字元就好了啊!

補充一下:
for /f “eol=$ skip=1 tokens=1-4 delims=a" %i in (“Test.txt") do echo %k
參數是可以混搭的,要注意「delims」有可能需要用空白,所以建議擺在最後一個,避免判斷錯誤。

其實到這邊就可以結束了,不過還是要提醒「/f」有很多方法可以用,如刪除每一槽下的「Autorun.inf」:
for /f %i in (‘mountvol ^| find “:\"‘) do del /s q %iAutorun.inf
就是一個很簡單的實例。

「for /f」實在是一個很實用的指令,但也是整個教學裡面最難學的。不過學完這個應該也會覺得還好,命令提示字元也不過爾爾,沒錯!的確沒有很難。下一章沒有新知識了,博君一笑罷了。

Windows- Blue Screen藍屏當機畫面的基本分析方式

$
0
0

Win7藍白畫面(藍屏) 問題搜尋法
(轉錄自: PTT)
藍白畫面發生時常使人慌亂 尤其是神出鬼沒的發生時(Win7近來常見) 由於個電腦的差異性 如 硬體 軟體 組合之不同 即使 換硬體 升Driver 爬Google代碼 也不一定能確切抓出問題點 當藍白當機問題頻率低(難和店家要求換貨,且責任硬體軟體難確定) Google代碼也常因個人配備,OS,Driver不同 而難以鎖定問題目標 且板友難幫忙 故目前的技術論壇除錯法傾向將.dmp檔上傳 以供熱心網友解析 PS. 所謂.dmp檔 是發生STOP狀況(藍白畫面)時 Windows自動傾印的記錄檔 通常儲存在 C:\Windows\Minidump\*.dmp 和 C:\Windows\MEMORY.dmp


———–以下是自行分析dmp檔的辦法(for Win7,XP為最底下視頻)————–

Step.0 怎麼知道到底何時?為何?當機

開始 -> (搜尋程式及檔案)中填入”事件檢視器” -> 執行之
左側分頁內 -> 選”事件檢視器(本機)” -> “系統管理事件摘要”欄中 -> “重大” 和 “錯誤” 項 (藍屏問題記錄在此) -> 雙擊 某問題分類 列出發生時間並檢視代碼和傾印檔

Step.1 怎麼看.dmp檔?

到此 http://www.microsoft.com/whdc/DevTools/Debugging/default.mspx 進入”Download Debugging Tools from the Windows SDK”這鏈結 ( http://go.microsoft.com/fwlink/?LinkID=191420 ) 下載 Winsdk_web 安裝時 其他不用選 只選 “Dubugging Tools for Windows”進行線上安裝 開始 -> 所有程式 -> Dubugging Tools for Windows -> Windbg File -> Open Crash Dump (選擇要開的.dmp檔) 列出的紀錄中 有鏈結字樣”!analyze -v” 點選可列出更細部資訊 ( 在此可用ctrl+F 搜尋在藍白畫面看到的關鍵字 以看到哪個軟硬體出問題 並了解問題代碼的意義 )

如何使用微軟的Debugging Tools分析記憶體傾印檔(Crash Dump File),以判斷Windows系統運作失敗的可能原因?
(出處: 這裡 03/23/2012)
Windows系統會突然出現當機、自動重開機或藍底白字(藍屏)的異常狀況,原因可能是系統設置錯誤、軟體異常、硬體故障或驅動程式異常等各種嚴重異常,導致Windows系統無法繼續運行。由於發生當機的原因很多,因此需要取得更多故障訊息來解決當機問題,當系統運行失敗時,系統會將記憶體傾印檔記錄下來,使用微軟的Debugging Tools分析記憶體傾印檔,可以協助判斷可能原因,請參考下述步驟說明。

1. 在Windows XP/Vista/7系統的【系統內容】→【進階】頁籤下的【啟動及修復】設定視窗中,預設會把系統失敗的偵錯資訊寫入記憶體傾印檔(如下圖)。

2. 參考上圖畫面設定,預設在C:\WINDOWS\Minidump或MEMORY.DMP可以找到記憶體傾印檔,後述步驟以「小記憶體傾印」為例。

比較差異: Differences between full memory dump files and mini memory dump files(出處)
A memory dump file can collect a variety of information. Typically, a support engineer must have all the contents of virtual memory to troubleshoot a problem. In other cases, you might want to capture less information to focus on a specific problem. The debugger is flexible. This flexibility lets you limit the information that a memory dump file captures by collecting either full memory dump files or mini memory dump files:

Full memory dump files.
These files contain the contents of virtual memory for a process. These files are the most useful when you are troubleshooting unknown issues. A support engineer can use these files to look anywhere in memory to locate any object, pull up the variable that was loaded on any call stack, and disassemble code to help diagnose the problem. The disadvantage of full memory dump files is that they are large. It also may take additional time to collect these files, and the process that is being recorded must be frozen while the dump file is created.

Mini memory dump files.
A mini dump file is more configurable than a full dump file and can range from only several megabytes (MB) up to the size of a full dump file. The size differs because of the amount of virtual memory that the debugger is writing to disk. Although you can gather mini memory dump files quickly and they are small, they also have a disadvantage. Mini dump files may contain much less information than full dump files. The information that a mini dump file gathers may be virtually useless to a support engineer if the area of memory that the support engineer has to troubleshoot was not captured. For example, if the heap memory is not written to the memory dump file, a support engineer cannot examine the contents of a message that was being processed at the time that the problem occurred. Useful information, such as the subject line and the recipient list, would be lost.

3. 點我造訪微軟網站下載Debugging Tools來安裝,執行【WinDbg】。

4. 點擊【File】→【Open Crash Dump】。

5. 選擇記憶體傾印檔。

6. 詢問是否儲存相關資訊,按Yes或No皆可。

7. 分析完成會看到一行【Probably caused by : 檔案名稱】的訊息,表示當機原因可能與這個檔案有關,搜尋電腦中的檔案或入口網站來查詢該檔案來自於什麼程式,如果您剛好設定過這個程式沒多久後就出現當機問題,就能針對該程式檢察來解決當機問題。

Step.2 看到了問題如何排除?

除了將搜尋到的資料Google 更建議到微軟技術服務 http://support.microsoft.com/search/?adv=1 下拉選單 選擇OS 後 再填入關鍵字搜尋 會發現 很多問題其實都已經有解決方案(即使不是終極的 也有暫時的) 舉個例: http://support.microsoft.com/kb/974410/zh-tw http://support.microsoft.com/kb/816036/zh-tw 都算是問題的詳解 有些問題 甚至還有未正式發布的修正檔(Hotfix)可嘗試 但要一定要”特別注意”的是 所謂的 Hotfix 是針對單一獨立問題的修正檔 也就是每個頁面的 Hotfix 都是不一樣的 “必需確定完全符合”該問題再裝 因為這些修正檔 只能算 Service Pack 的beta檔 相容性和安全性微軟不保證 由於非完全正式公開 如需要 按下鏈結 填入mail 微軟會寄一個下載連結給你

imagex 的使用教學介紹 –擷取、修改及套用映像

$
0
0

(參考微軟教學網頁), 然整理如下:

什麼是 ImageX?

ImageX 是一套命令列工具,可讓原始設備製造商 (OEM) 與企業擷取、修改及套用以檔案為基礎的磁碟映像,以利快速部署。 ImageX 可與 Windows 映像檔案 (.wim) 搭配使用,將檔案複製到網路,也可以與使用 .wim 映像的其他技術搭配使用,例如 Windows 安裝程式、Windows 部署服務 (Windows DS) 以及 System Management Server (SMS) 作業系統功能部署套件。

ImageX 如何運作

ImageX 是從一組 API (稱為 Windows 的映像 API) 組建的映像工具。ImageX 的主要目的是擷取、修改及套用映像,以部署於製造商或公司的 IT 環境中。ImageX 支援新的 Microsoft Windows 映像 (.wim) 格式。

ImageX 結構: ImageX 會依賴數個元件,包括 ImageX 執行檔 (ImageX.exe)、WIM 檔案系統篩選器 (Wimfltr.sys 及 Wimfltr.inf)、WIM API 集,以及 .wim 檔案格式。下圖顯示這些元件之間的互動。

ImageX 命令列選項

ImageX 是 Windows Vista 的命令列工具,可用來建立及管理 Windows 映像 (.wim) 檔案。.wim 檔案包含一或多個磁碟區映像、包含已安裝之 Windows 作業系統映像的磁碟區。

若要修改磁碟區映像,您必須在執行 Windows XP Service Pack 2 (SP2)、Windows Server 2003 Service Pack 1 (SP1) 或 Windows Vista 的電腦上,安裝 Windows 映像檔案系統篩選器 (WIM FS 篩選器) 驅動程式。安裝 WIM FS 篩選器驅動程式可讓您將 .wim 檔案當成目錄一樣掛接,而且不用解壓縮或重新建立映像,就能在檔案管理工具 (例如 Windows 檔案總管) 中瀏覽、複製、貼上及編輯磁碟區映像。

mageX 命令列選項的用法如下:
imagex [flags] {/append | /apply | /capture | /delete | /dir | /export | /info | /split | /mount | /mountrw | /unmount} [parameters]

下列清單會顯示每個 imagex 作業類型所用的有效語法:

  • imagex /append image_path image_file {“description”} {/boot | /check | /configconfiguration_file.ini | /scroll | /verify}
    將磁碟區映像附加到現有的 Windows 映像 (.wim) 檔案。建立檔案的單一例項、將其與 .wim 檔案中已存在的資源相比較,讓您不致於重複擷取同一個檔案。
    • ex: imagex /append d:d:\imaging\data.wim “Drive D” /verify
  • imagex /apply image_file image_number image_name image_path {/check | /ref | /scroll | /verify}
    將磁碟區映像套用到指定的磁碟機。
    • ex: imagex /apply d:\imaging\data.wim 1 d:\New_Directory /verify
  • imagex /capture image_path image_file “name” {“description”} {/boot | /check | /compress [type] | /config | /flags “EditionID” | /norpfix | /scroll | /verify}
    將來自磁碟機的磁碟區映像擷取到新的 .wim 檔案。擷取的目錄會包含所有的子資料夾及資料。您無法擷取空的目錄。目錄必須至少包含一個檔案。
    • ex: imagex /capture d:d:\imaging\data.wim “Drive D” /verify
    • ex: imagex /compress fast /flags “Ultimate” /check /scroll /capture c:d:\install.wim “Windows Vista Ultimate”
  • imagex /delete image_file image_number image_name {/check}
    從含有多個磁碟區映像的 .wim 檔案中,刪除指定的磁碟區映像。此選項只會刪除中繼資料項目及 XML 項目。它不會刪除串流資料,也不會最佳化 .wim 檔案。
    • ex: imagex /delete d:\imaging\data.wim 1
  • imagex /dir image_file image_number image_name
    顯示指定之磁碟區映像內檔案及資料夾的清單。
    • ex: imagex /dir d:\imaging\data.wim 1
  • imagex /export src_file src_number src_name dest_file dest_name {/boot | /check | /compress [type] | /ref [splitwim.swm]}
    將指定之 .wim 檔案的複本匯出至其他的 wim. 檔案。來源及目的檔案必須使用同一個壓縮類型。您也可以匯出至新的映像檔案,將映像最佳化。當您修改映像時,ImageX 會儲存其他資源,使得映像整體大小增加。匯出映像會移除不必要的資源檔案。
    • ex: imagex /export d:\imaging\data.wim d:\imaging\sample.wim 1
  • imagex /info img_file[img_number | img_name] [new_name] [new_desc] {/boot | /check}
    傳回針對指定 .wim 檔案所儲存的 XML 描述,包括 (但不限於) 檔案大小總計、映像索引編號、目錄計數、檔案計數及描述。
    ex: imagex /info d:\imaging\data.wim
  • imagex /mount image_file image_number image_name image_path {/check}
    從 Microsoft Windows XP Service Pack 2 (SP2)、Microsoft Windows Server 2003 Service Pack 1 (SP1) 或 Windows Vista 掛接具有唯讀權限的 .wim 檔案至指定的目錄。檔案一經掛接之後,您便可檢視 (但不能修改) 目錄中包含的所有資訊。
    • ex: imagex /mount d:\imaging\data.wim 2 c:\mounted_images
  • imagex /mountrw image_file image_number image_name image_path {/check}
    從 Microsoft Windows XP Service Pack 2 (SP2)、Microsoft Windows Server 2003 Service Pack 1 (SP1) 或 Windows Vista 掛接具有讀取/寫入權限的 .wim 檔案至指定的目錄。檔案一經掛接之後,您便可檢視及修改目錄中包含的所有資訊。
    • ex: imagex /mountrw d:\imaging\data.wim 2 c:\mounted_images
  • imagex /split image_file dest_file size {/check}
    將現有的 .wim 檔案分割為多個唯讀分割 .wim 檔案 (.swm)。
    • ex: imagex /split d:\imaging\data.wim 600
  • imagex /unmount image_path {/commit}
    取消掛接指定目錄中的已掛接映像。
    • ex: imagex /unmount /commit c:\mounted_images


/verify 及 /check 支援 .wim 檔案的檔案驗證及資料完整性

在套用作業期間,/verify 及 /check 選項會影響效能。建議您使用 /verify 及 /check 兩個選項以獲得最佳的映像驗證及資料完整性。

  • /verify 選項: 會驗證快取寫入並檢查錯誤及檔案重複。/verify 選項不支援磁碟清除、寫出或略過系統快取。在擷取作業期間,/verify 選項會讀回擷取的檔案,並依每個位元組與原始所擷取檔案進行比較。在套用作業期間,/verify 選項會重新雜湊套用的檔案,並與在擷取作業期間所產生的雜湊進行比較。
  • /check 選項: 是專為偵測 .wim 檔案的損毀而設計。如果未在擷取作業期間設定 /check 選項,則在套用作業期間會忽略旗標。在擷取作業期間,/check 選項會對 .wim 檔案以每 10 MB 資料區塊的方式產生及儲存一系列的雜湊。在套用作業期間,/check 選項會對在擷取作業期間所儲存的雜湊進行雜湊並驗證這些 10 MB 的區塊。

ImageX 錯誤碼

  • 0 成功
  • 1 命令列選項無效
  • 2 WIMGAPI 失敗
  • 3 設定指令碼無效
  • 4 拒絕存取,需要系統管理員權限

什麼是.wim檔 ?

http://eeepage.info/windows-imaging-file-format-wim/

DevCon 或 DevCon64 可以啟用、 停用、 重新啟動、 更新、 移除,和查詢個別裝置群組。

$
0
0

DevCon 公用程式是一個命令列公用程式,做為 [裝置管理員的替代。 使用 DevCon,您可以啟用、 停用、 重新啟動、 更新、 移除,和查詢個別裝置群組。

Windows Device Console (Devcon.exe)

https://msdn.microsoft.com/zh-tw/library/ff544707(v=vs.85).aspx
DevCon (Devcon.exe), the Device Console, is a command-line tool that displays detailed information about devices on computers running Windows. You can use DevCon to enable, disable, install, configure, and remove devices.
DevCon runs on Microsoft Windows 2000 and later versions of Windows.

What you can do with DevCon

Windows driver developers and testers can use DevCon to verify that a driver is installed and configured correctly, including the proper INF files, driver stack, driver files, and driver package. You can also use the DevCon commands (enable, disable, install, start, stop, and continue) in scripts to test the driver.

DevCon is a command-line tool that performs device management functions on local computers and remote computers.
(Note: To run DevCon commands on a remote computer, the Group Policy setting must allow the Plug and Play service to run on the remote computer. On computers that run Windows Vista and Windows 7, the Group Policy disables remote access to the service by default. On computers that run WDK 8.1 and WDK 8, the remote access is unavailable.)

Devcon features include:

  • Display driver and device info:  DevCon can display the following properties of drivers and devices on local computers, and remote computers (running Windows XP and earlier):
    • Hardware IDs, compatible IDs, and device instance IDs. These identifiers are described in detail in Device Identification Strings.
      Device setup classes
      The devices in a device setup class
      INF files and device driver files
      Details of driver packages
      Hardware resources
      Device status
      Expected driver stack
      Third-party driver packages in the driver store
  • Search for devices:  DevCon can search for installed and uninstalled devices on a local or remote computer by hardware ID, device instance ID, or device setup class.
  • Change device settings :  DevCon can change the status or configuration of Plug and Play (PnP) devices on the local computer in the following ways:
    • Enable a device
    • Disable a device
    • Update drivers (interactive and noninteractive)
    • Install a device (create a devnode and install software)
    • Remove a device from the device tree and delete its device stack
    • Rescan for Plug and Play devices
    • Add, delete, and reorder the hardware IDs of root-enumerated devices
    • Change the upper and lower filter drivers for a device setup class
    • Add and delete third-party driver packages from the driver store
  • Restart the device or computer : DevCon can restart a local device, reboot the local system on demand, or reboot the local system if required for another DevCon operation.
Viewing all 57 articles
Browse latest View live